


ICT Optimal Trade Entry, often shortened to ICT OTE, is a retracement-based entry idea used inside the Inner Circle Trader style of analysis. It is popular because it gives traders a more specific location to plan entries after price has already shown liquidity behavior, displacement, and a clear directional move.
Quick answer: ICT Optimal Trade Entry is a model where traders wait for price to retrace into a preferred area of a clean dealing range, often around the deeper portion of the impulse, after liquidity has been taken and displacement has confirmed direction. The OTE zone is not a signal by itself. It needs context, confirmation, invalidation, and a realistic target.
This article supports the broader Smart Money hub and the ICT Models category. For the foundation, read the ICT Trading complete beginner guide and ICT Market Structure Explained first. Those pages make OTE easier to understand because the model depends on structure and liquidity.
Nothing here is financial advice. OTE can help organize trade location, but every setup can fail. Use it as a planning framework, not as a guaranteed entry formula.
For beginners, the simplest way to think about OTE is this: do not chase the displacement; wait for the market to offer a retracement that still respects the original idea. If the retracement destroys the structure or breaks the invalidation point, the setup is no longer optimal. It is just a failed idea.
Definition
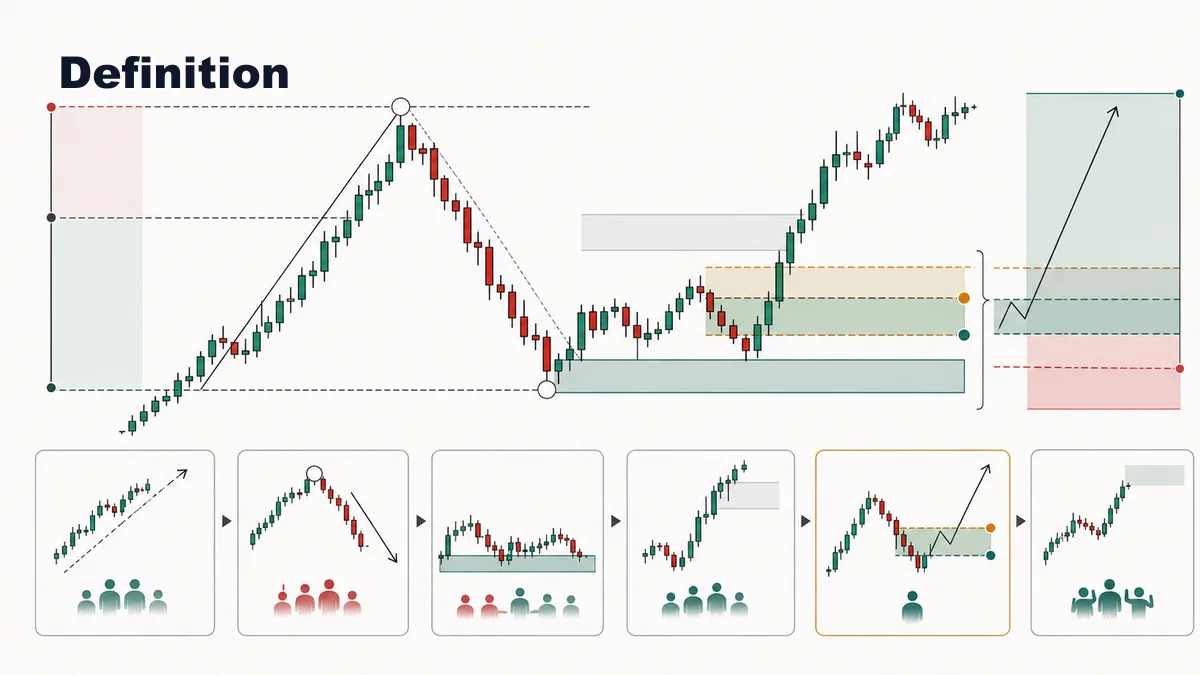
ICT Optimal Trade Entry is an entry concept built around a selected dealing range. A dealing range is the swing from a meaningful low to a meaningful high in a bullish model, or from a meaningful high to a meaningful low in a bearish model. After price creates a directional move, traders watch for a retracement back into an area where the reward-to-risk may become more attractive.
Many traders associate OTE with Fibonacci retracement levels, especially the deeper retracement zone often discussed inside ICT education. But the tool is not useful if it is drawn on every random swing. The quality comes from the sequence around it: higher-timeframe bias, liquidity taken, displacement, a clear range, and a logical entry trigger.
In a bullish OTE model, price may sweep sell-side liquidity, displace upward, create a fair value gap or market structure shift, and then retrace into a discount area. In a bearish OTE model, price may sweep buy-side liquidity, displace downward, and retrace into a premium area before continuing lower.
This makes OTE different from basic Fibonacci trading. A standard retracement trader may draw levels after any swing. An ICT-style OTE trader first asks whether the market created a meaningful reason for the swing. Liquidity, displacement, structure, and risk come before the retracement zone.
How to Identify
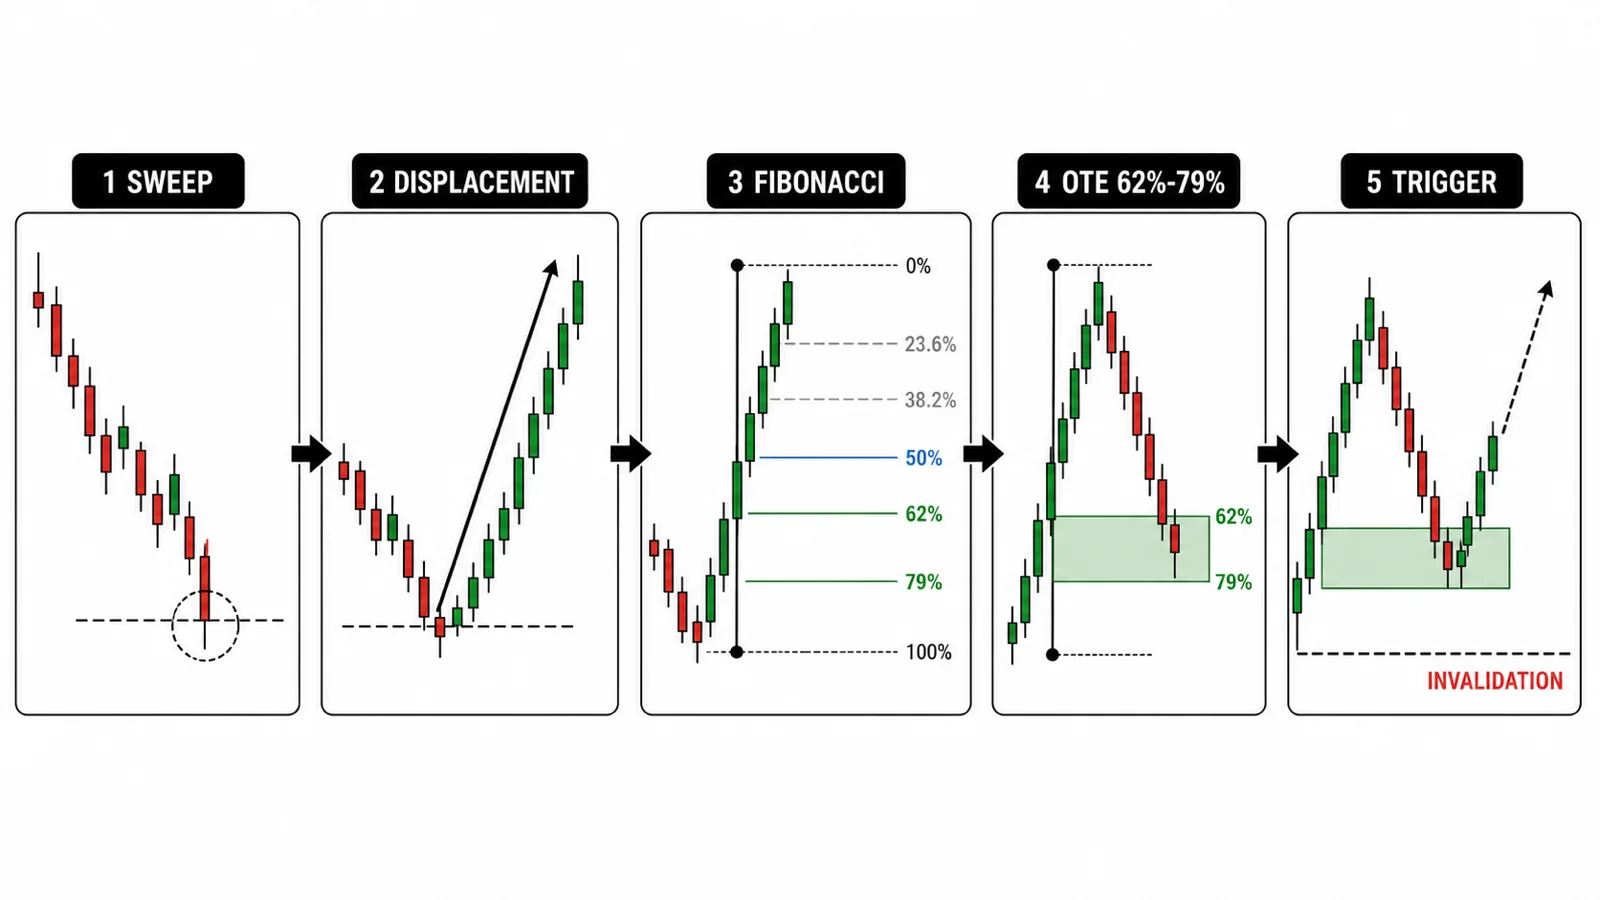
Start with higher-timeframe bias. Before drawing any retracement, decide whether price is likely working toward buy-side liquidity, sell-side liquidity, an imbalance, or a major reaction area. OTE is strongest when it supports the higher-timeframe story instead of fighting it.
Next, mark obvious liquidity. A bullish model may begin after price sweeps a previous low, session low, or equal lows. A bearish model may begin after price sweeps a previous high, session high, or equal highs. The sweep is not enough by itself. You need to study what price does after the sweep.
Then look for displacement. A valid OTE dealing range should come from a move that shows urgency and changes short-term structure. A slow drift is less convincing. Displacement may leave a fair value gap, break a short-term swing, or show that control has shifted.
Finally, draw the range from the swing that created the displacement. In a bullish model, draw from the low to the high of the impulse. In a bearish model, draw from the high to the low. The OTE zone is where price retraces into a favorable portion of that range, but the exact entry still needs confirmation.
A useful test is whether the dealing range is obvious without zooming into tiny candles. If the swing is too small, too messy, or built from overlapping price action, the OTE zone will usually be low quality. The cleaner the impulse, the easier it is to judge whether the retracement is healthy or destructive.
Why It Works
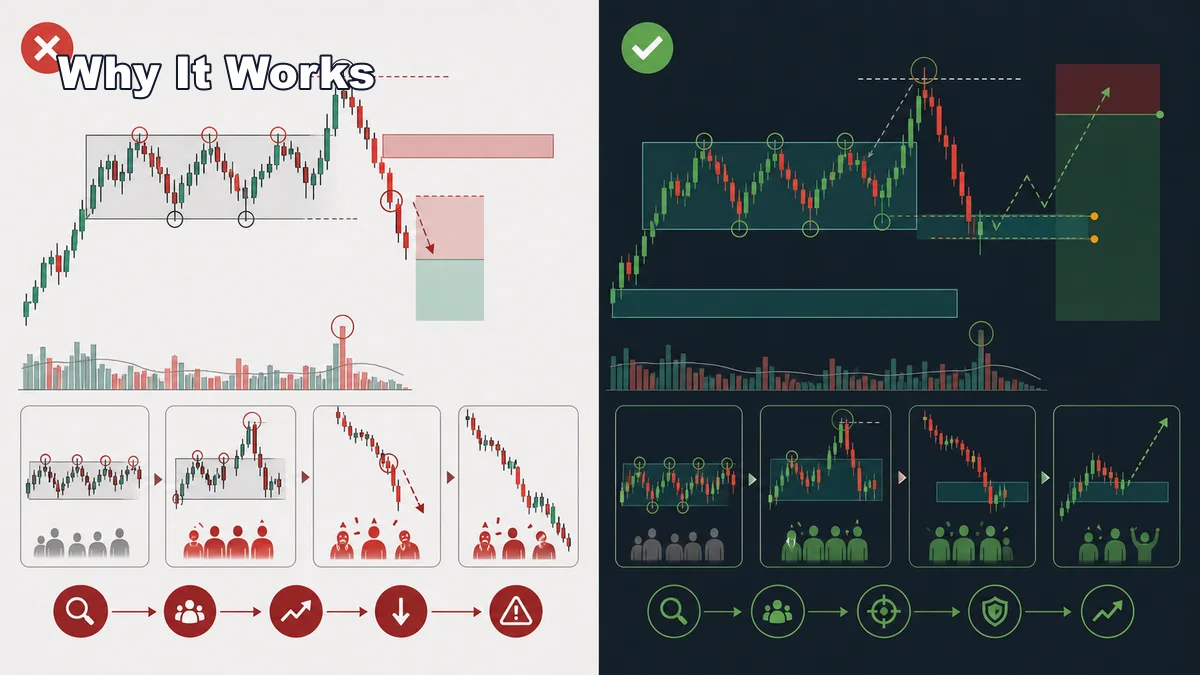
ICT Optimal Trade Entry works as a planning model because it discourages chasing the first displacement candle. Many traders see a strong move and enter late, only to watch price retrace against them. OTE asks the trader to wait for price to return to a more efficient location.
The model also connects entry location with liquidity logic. If price has swept liquidity and displaced away from the level, a retracement may allow traders to enter closer to invalidation. That can improve reward-to-risk compared with entering after the move is already extended.
OTE also helps define the trade idea. The trader can identify the sweep, the displacement leg, the retracement zone, the trigger, the invalidation point, and the target liquidity. The setup can still fail, but the plan is easier to review because each part has a purpose.
The danger is treating OTE like a magic Fibonacci level. A retracement zone without liquidity, displacement, structure, or timing is just a drawing. The model works best when it is the final entry filter, not the first reason for a trade.
OTE can also help traders avoid emotional entries. A strong displacement candle often creates fear of missing out. Waiting for retracement forces the trader to slow down, compare price with the dealing range, and decide whether the setup still offers enough room to target.
Step-by-Step Usage
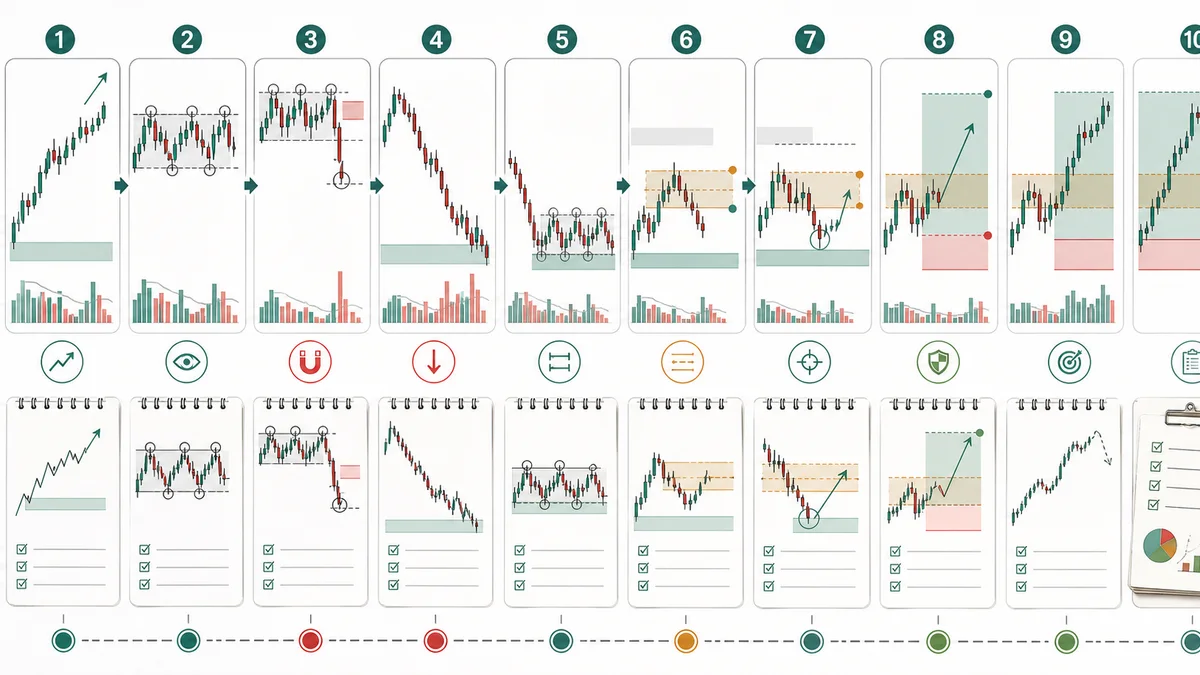
- Choose the timeframe stack. Use higher timeframe context, a setup timeframe, and an execution timeframe that you can review consistently.
- Build directional bias. Ask whether price is moving toward liquidity, an imbalance, or a major reaction area.
- Wait for liquidity interaction. Look for a sweep, raid, or clear rejection around obvious highs or lows.
- Require displacement. Wait for a strong move away from the liquidity event that breaks meaningful short-term structure.
- Define the dealing range. Use the impulse that created the shift, not a random swing chosen after the fact.
- Watch the OTE zone. Let price retrace into the preferred area, ideally with fair value gap, order block, or premium-discount alignment.
- Use a trigger. Look for lower-timeframe shift, rejection, candle confirmation, or failure to continue against the idea.
- Set invalidation and target. Invalidation often sits beyond the sweep or dealing range extreme. Targets often connect to opposing liquidity.
This process helps prevent the most common OTE problem: drawing retracement levels first and then hunting for reasons to enter.
Before using real risk, practice the sequence on screenshots. Mark the liquidity event, then the displacement, then the dealing range, then the retracement zone. If you cannot mark the steps in order, the setup is probably not clean enough for an OTE plan.
Confirmation Rules
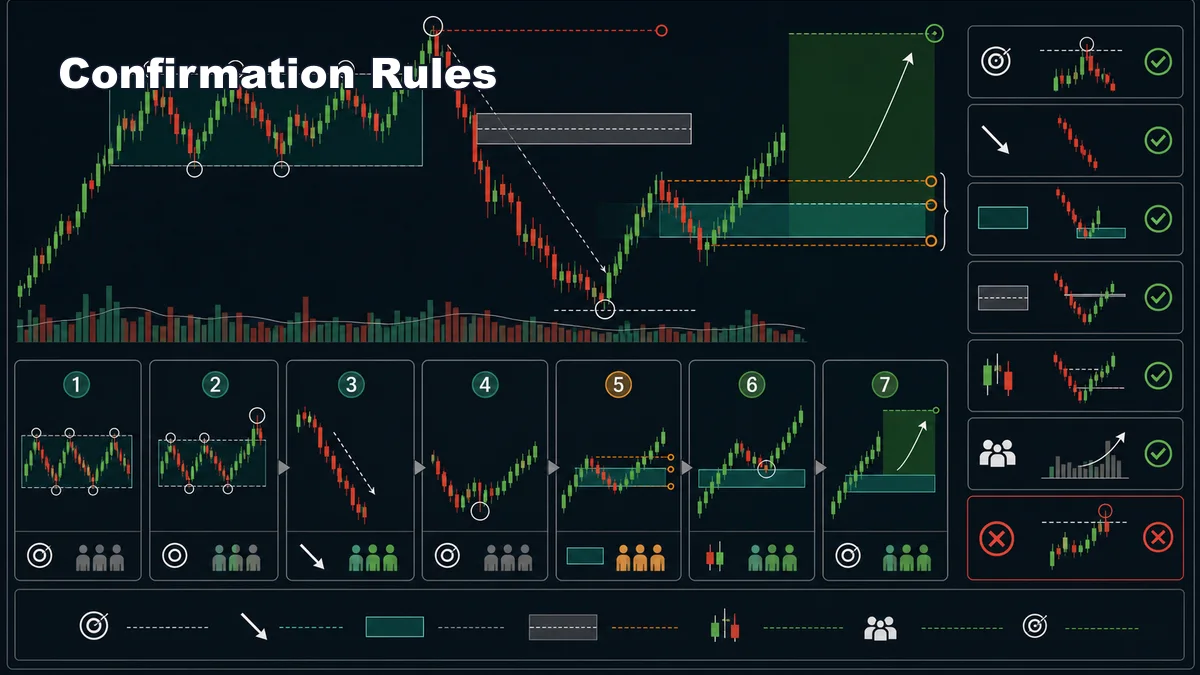
- Liquidity should be obvious: the model is cleaner after price interacts with a clear high, low, session extreme, or equal level.
- Displacement should change the story: the move away from liquidity should be strong enough to break meaningful structure.
- The dealing range should be clean: avoid drawing OTE on messy swings where the impulse is not clear.
- The retracement should respect context: bullish OTE is stronger in discount, while bearish OTE is stronger in premium.
- Confluence helps: fair value gap, order block, breaker, or previous structure can improve the quality of the zone.
- Entry needs a trigger: a touch of the OTE zone is not enough. Wait for price behavior that supports the idea.
- Invalidation must be visible: if you cannot define where the OTE is wrong, the trade is not ready.
Confirmation should make the setup clearer, not more complicated. If you need too many labels to justify the trade, the model may be weak.
Timing also matters. Many traders prefer OTE setups during active sessions because displacement and retracement can be cleaner when participation is higher. Around major news, spreads and volatility can distort the model, so confirmation should be judged more carefully.
Examples
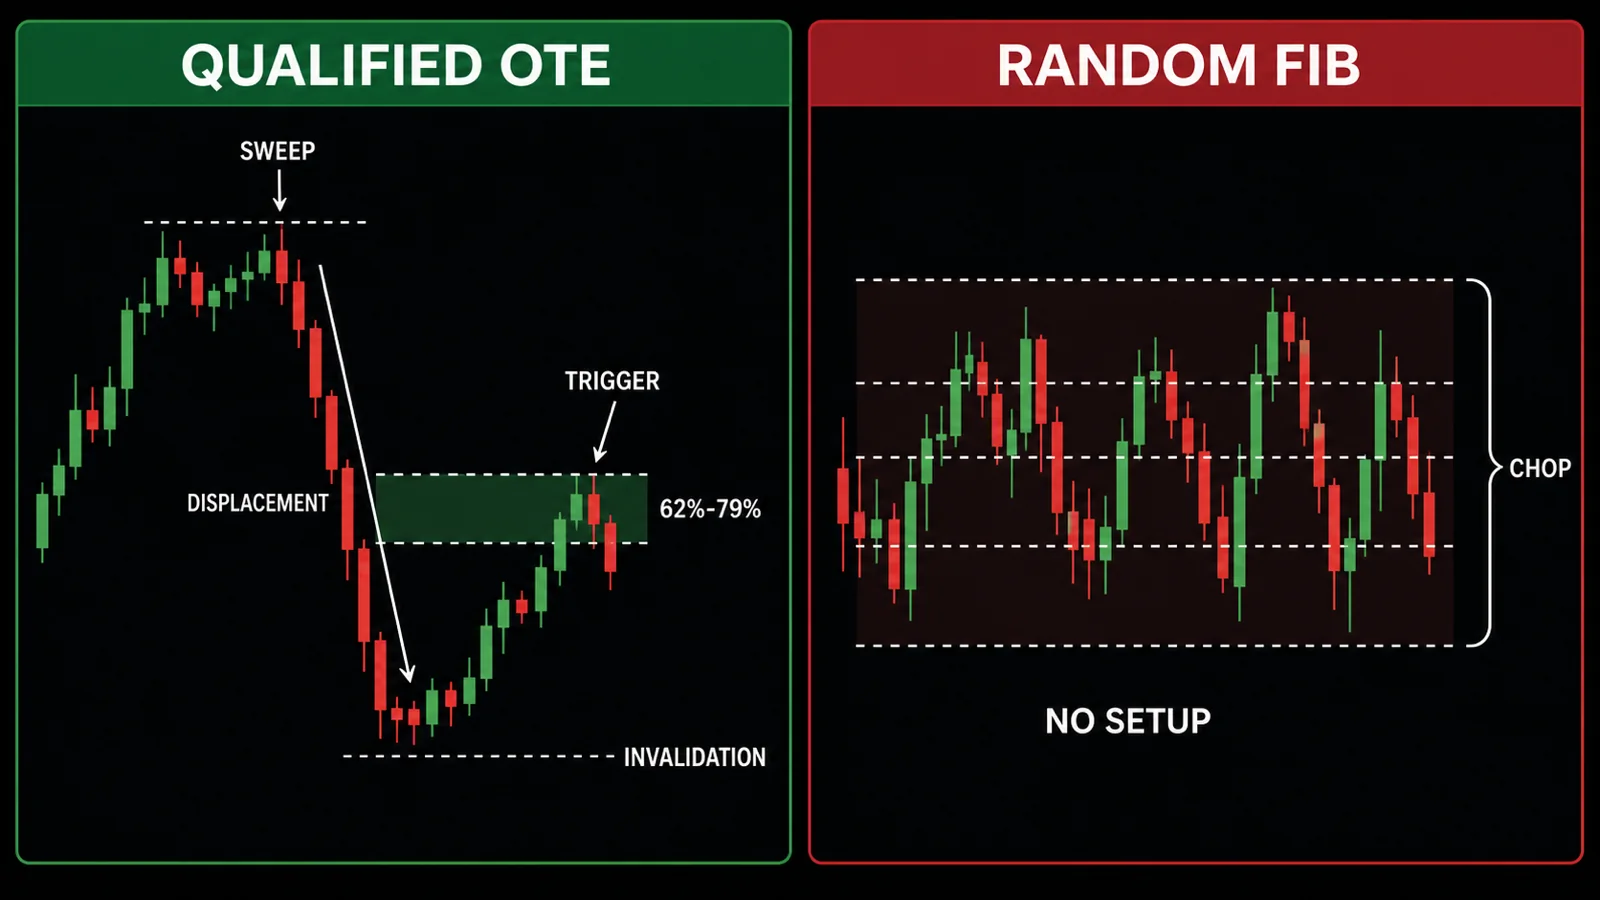
Example one is a bullish OTE. Price trades below a previous low, sweeps sell-side liquidity, then quickly reclaims and displaces upward through a short-term high. The displacement leaves a fair value gap. A trader draws the dealing range from the sweep low to the displacement high and waits for price to retrace into the OTE area. If lower-timeframe structure shifts upward again, the trader can define invalidation below the sweep low and target buy-side liquidity.
Example two is a bearish OTE. Price trades above equal highs, fails to hold, and displaces lower through a short-term low. The trader draws the dealing range from the sweep high to the displacement low. If price retraces into a premium area that overlaps with a fair value gap or bearish order block, a lower-timeframe rejection can become the trigger. Invalidation may sit above the sweep high.
Example three is a failed OTE. Price sweeps a low and moves higher, but the move is weak and does not break meaningful structure. The trader still draws a retracement zone and enters. Price then breaks below the sweep low. The failure shows that the model was incomplete because displacement and structure confirmation were missing.
Example four is a skipped setup. Price creates a strong displacement and retraces into the preferred zone, but the target is too close to nearby opposing liquidity and the stop would be wide. Even if the model looks clean, the trade may not be worth taking. OTE is about location and risk, not just entry excitement.
Common Mistakes
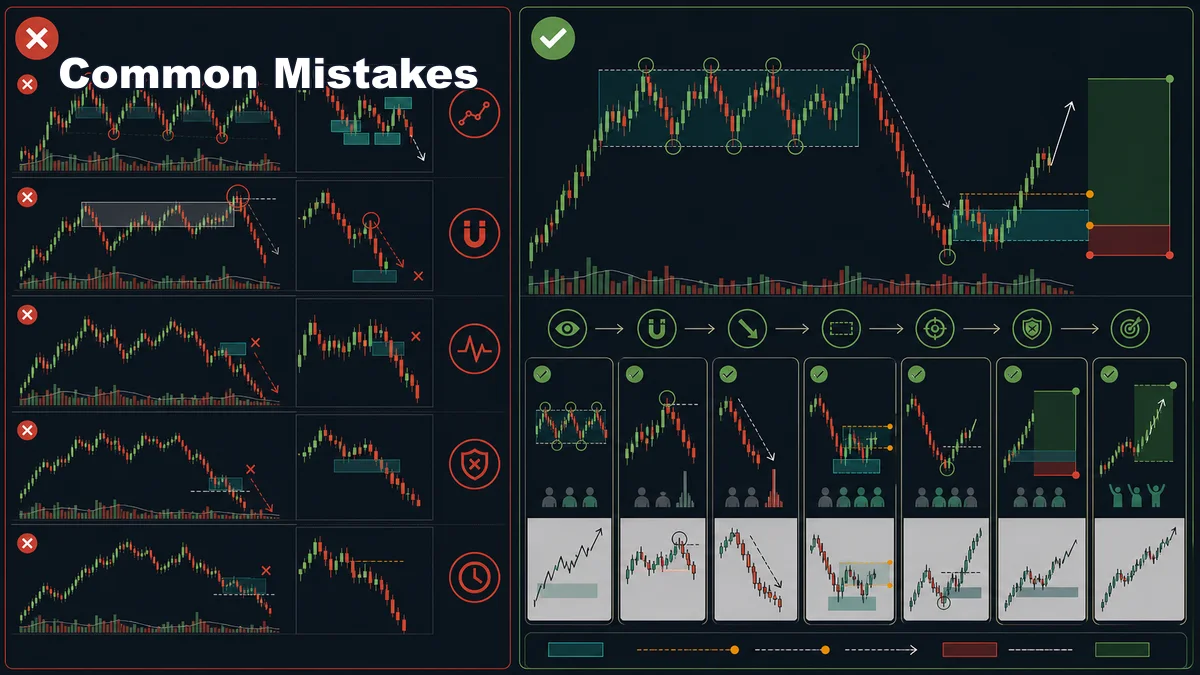
- Drawing OTE on every swing: not every retracement is an optimal trade entry. The range needs context and displacement.
- Ignoring liquidity: OTE is much weaker when price has not interacted with meaningful liquidity first.
- Entering without displacement: a retracement after a weak move is usually lower quality.
- Using no trigger: touching the zone is not confirmation. Wait for price behavior that supports the entry.
- Forgetting invalidation: the setup needs a clear point where the idea is wrong.
- Chasing late retracements: if price has already reacted strongly from the zone, the reward-to-risk may be gone.
- Mixing timeframes poorly: a lower-timeframe OTE against a major higher-timeframe level may fail quickly.
ICT Optimal Trade Entry is useful when it makes entries more disciplined. It should come after the broader story is clear: liquidity, structure, displacement, retracement, trigger, invalidation, and target. Continue the learning path through the Smart Money hub, the ICT Models category, ICT Trading complete beginner guide, and ICT Market Structure Explained.
The best use of OTE is not to find a perfect entry on every chart. It is to wait for a complete model, enter from a better location, and know exactly where the trade idea becomes invalid.
Continue learning: start with the trading homepage or follow the Trading Learning Path: Levels 1–5.
Sources and limits
General market-risk and technical-analysis references:
Strategy labels and chart examples are interpretive; they are not standardized signals and do not guarantee outcomes.