


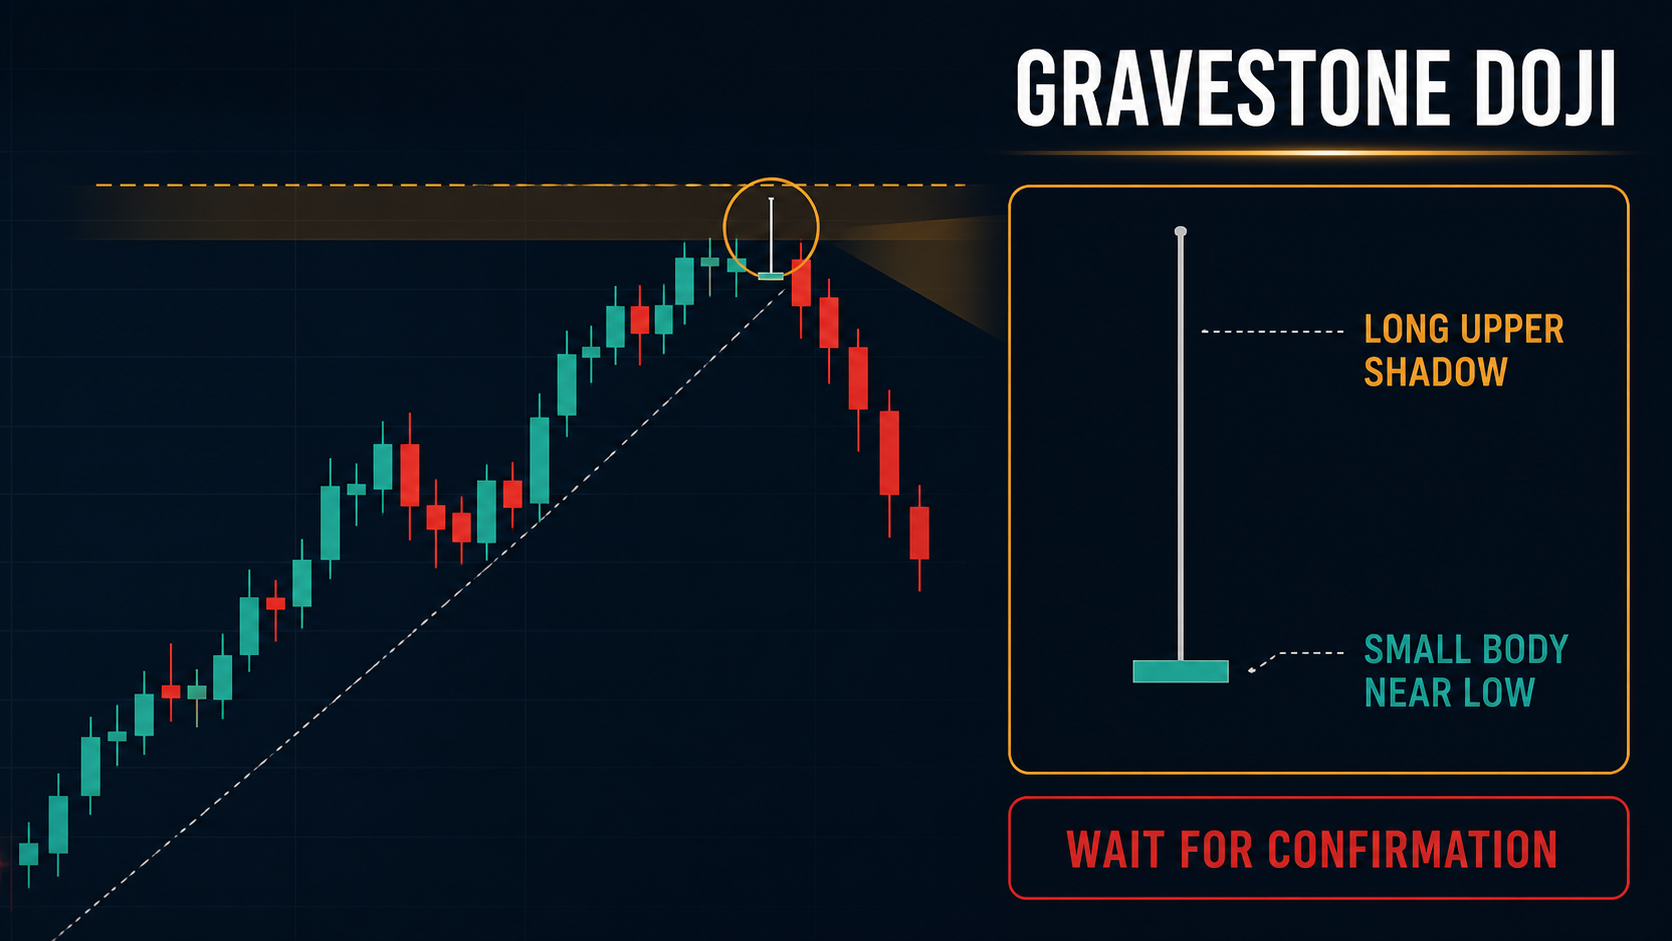
A Gravestone Doji is a single candlestick with the open and close near the session low, a long upper shadow, and little or no lower shadow. It records an attempt to trade higher that was rejected before the candle closed. The pattern can support a bearish-reversal hypothesis after an advance and at resistance, but it is not a sell signal by itself. Location, confirmation, invalidation, liquidity and execution costs remain essential.
Key takeaways
- The open and close are near the low, with a long upper shadow.
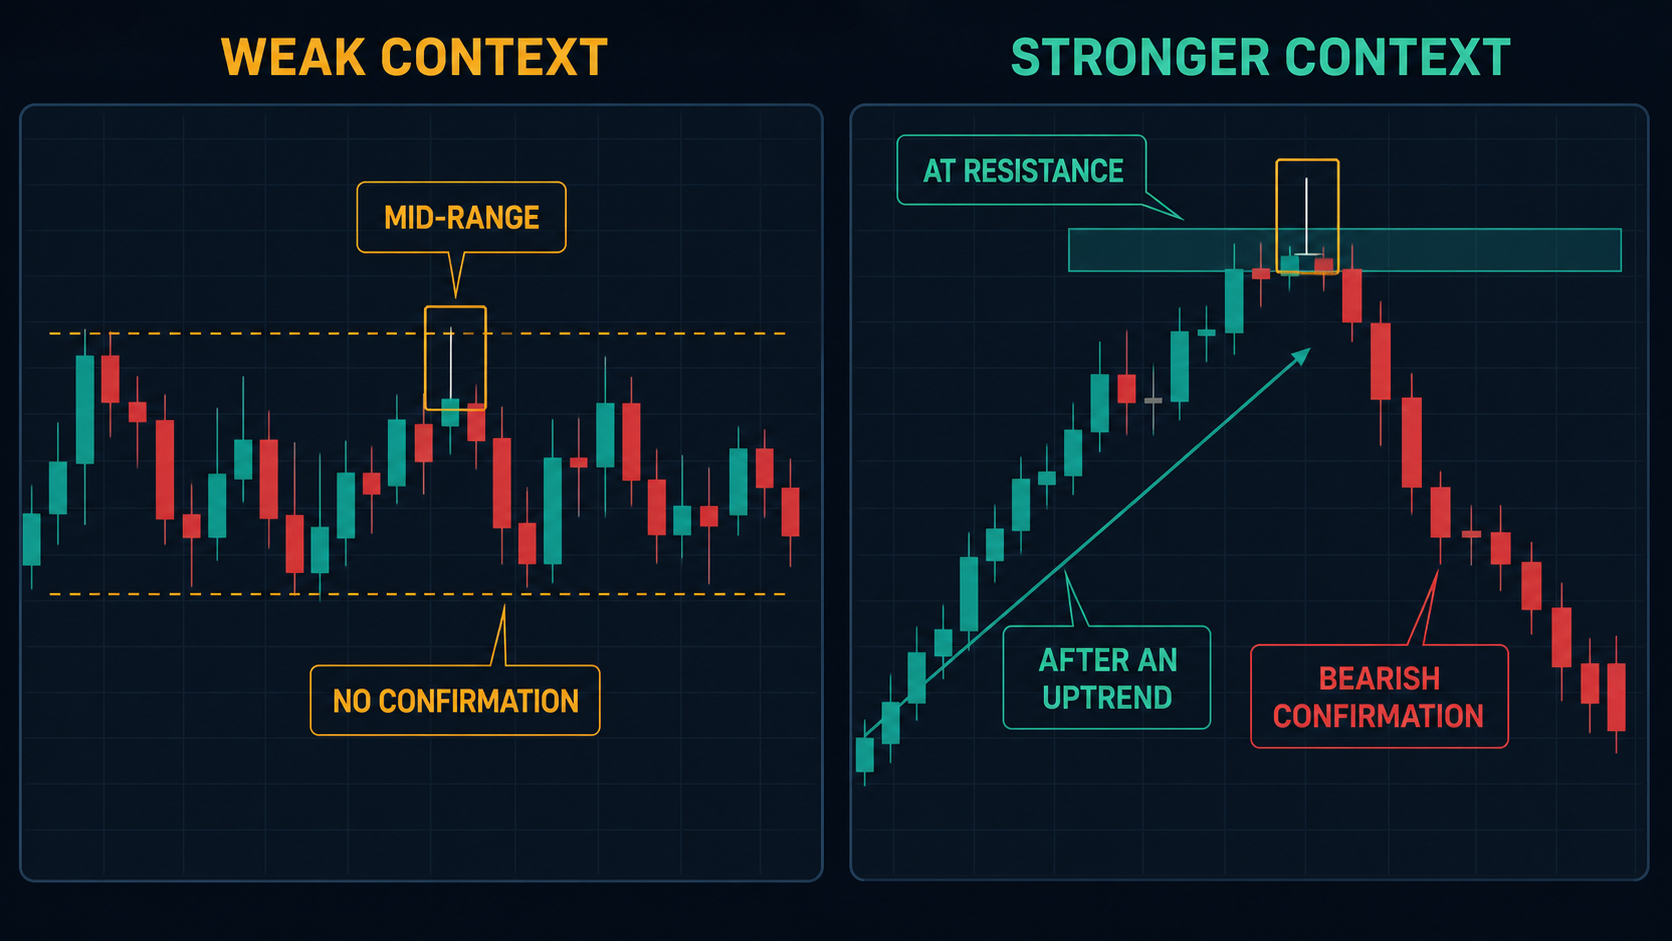
- Context after an advance and at resistance is more relevant than a mid-range candle.
- Wait for bearish confirmation or a failed retest under a defined rule.
- Invalidation usually belongs beyond the rejected high or relevant structure.
- No candlestick pattern guarantees direction.
What is a Gravestone Doji?
The candle opens near its low, trades substantially higher, then returns to close near the low. Buyers were able to push price up during the period, but could not maintain those prices by the close. This describes observed auction behavior; it does not identify who traded or prove institutional intent.
How to recognize the candle
| Feature | Typical appearance | Why it matters |
|---|---|---|
| Body | Very small and near the low | Open and close are nearly equal |
| Upper shadow | Long relative to the body | Shows rejection of higher prices |
| Lower shadow | Little or none | Separates it from other Doji variants |
| Color | Less important than shape | Context matters more than body color |
Real market candles rarely match a textbook perfectly. Define a tolerance for body size and shadow ratios before testing rather than changing the definition after seeing the outcome.
Market psychology and its limits
The long upper shadow indicates that price explored higher levels and returned. A common interpretation is that buying pressure failed or selling pressure increased near the high. That interpretation remains probabilistic. The candle can also appear during a range, low-liquidity period or news-driven spike and produce no sustained reversal.
Where the pattern has stronger context
- After a visible advance rather than in random sideways movement.
- At a previously defined resistance or supply area.
- Near a failed breakout or rejected range high.
- When a higher timeframe also shows limited room above.
- When the following candle confirms instead of immediately reclaiming the high.
Weak-context cases
A Gravestone Doji is less useful in the middle of a broad range, directly before a major scheduled event, or when the candle is created by an abnormal spread spike. It is also weaker when the next candles accept above its high. Avoid calling every long upper wick a Gravestone Doji; a Shooting Star normally has a visible real body and different tolerance.
Confirmation methods
| Method | Condition | Trade-off |
|---|---|---|
| Close confirmation | Next candle closes below the Doji low | Clearer evidence but later entry |
| Structure confirmation | Lower-timeframe swing support breaks | More detail but more noise |
| Retest confirmation | Broken level retests and rejects | Potentially cleaner invalidation but may not occur |
A conservative trading workflow
- Mark higher-timeframe trend and resistance before the candle appears.
- Check that the candle satisfies the written anatomy rule.
- Wait for the chosen confirmation method.
- Place invalidation beyond the rejected high or relevant structure.
- Identify TP1 and TP2 from actual support areas.
- Calculate position size from stop distance and maximum risk.
- Skip the trade when spread, slippage or event risk invalidates assumptions.
Hypothetical example
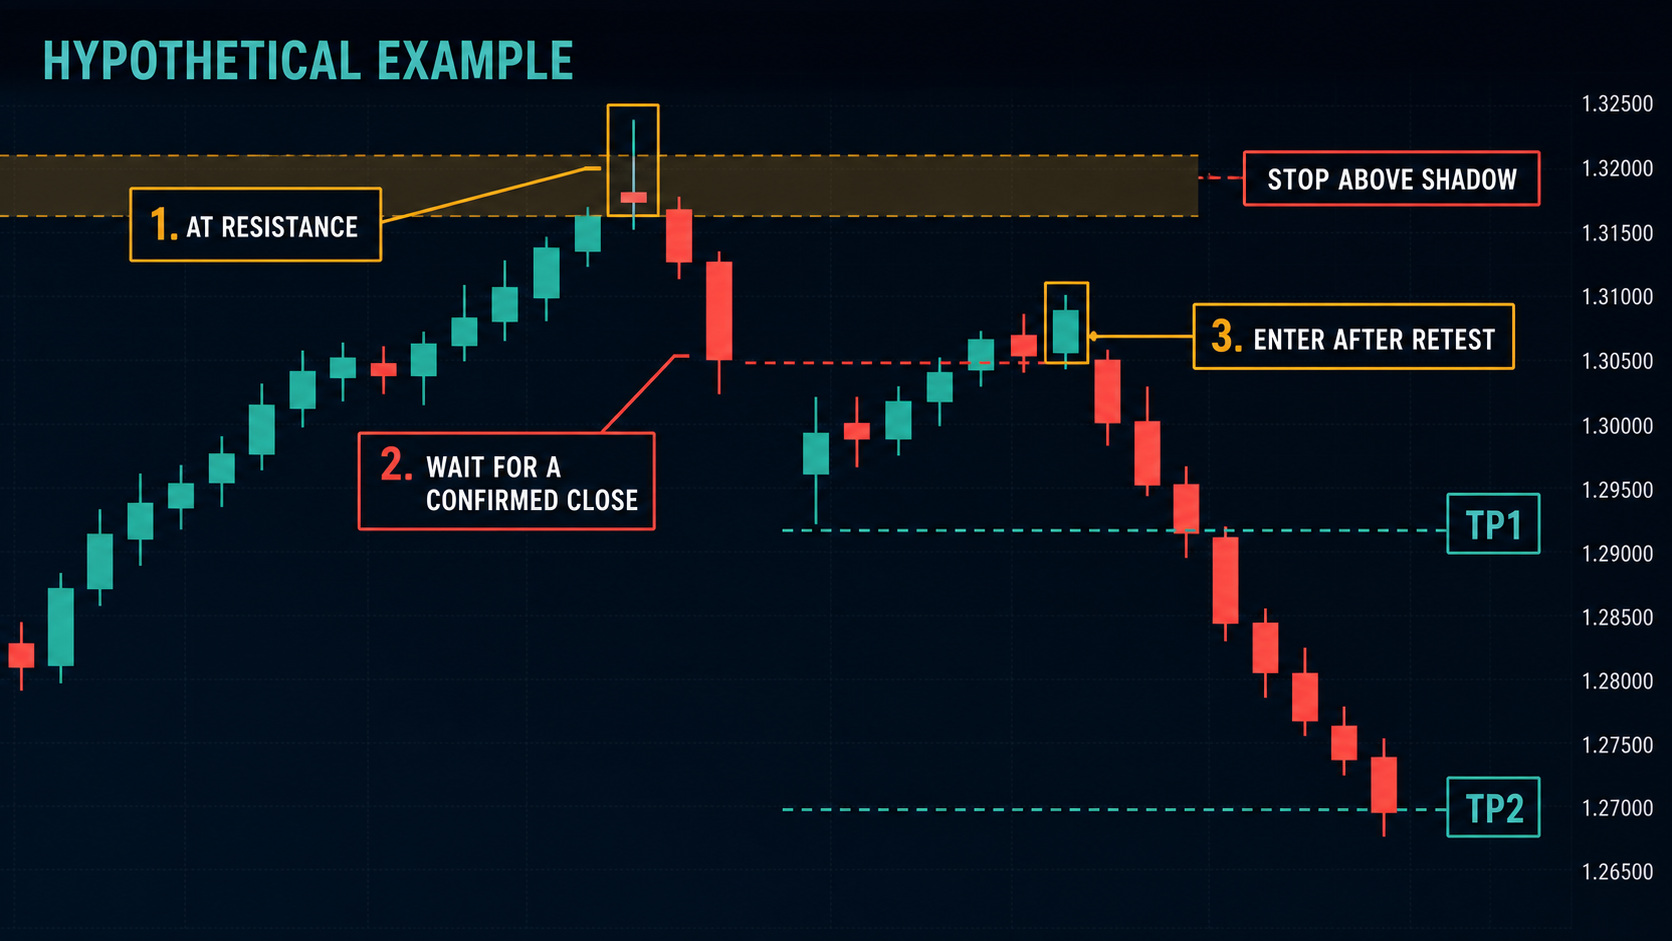
Price advances into daily resistance and prints a Gravestone Doji. The next H1 candle closes below the Doji low. Price then retests the broken intraday level and rejects it. A trader using this model might evaluate a short entry, with invalidation above the upper-shadow high and targets at the nearest supports. If price accepts above the high, the bearish thesis is invalidated. This is not a current signal.
Stop-loss and target logic
A stop placed inside the upper shadow can be vulnerable to a normal retest. A stop above the high reflects structural invalidation but may require smaller position size. Targets should come from support, range boundaries or another tested method. Forcing a fixed 3R target beyond a nearby support area creates an unrealistic plan.
Common mistakes
- Selling immediately when the candle closes.
- Ignoring whether a prior advance exists.
- Calling any candle with an upper wick a Gravestone Doji.
- Using the pattern in the middle of a range.
- Moving the stop farther after entry.
- Quoting a universal win rate without a source and rule set.
Gravestone Doji versus related candles
| Pattern | Main distinction |
|---|---|
| Dragonfly Doji | Long lower shadow with body near the high |
| Shooting Star | Small but visible body after an advance |
| Long-Legged Doji | Long shadows on both sides |
| Inverted Hammer | Similar shape but interpreted after a decline |
Continue learning: candlestick patterns and context, how to read OHLC and shadows, Price Action framework, multi-timeframe analysis, bearish candlestick patterns and.
How to backtest a Gravestone Doji rule
A useful backtest requires an operational definition. Write the maximum body-to-range ratio, minimum upper-shadow ratio, permitted lower-shadow size, prior-trend condition and confirmation rule before collecting examples. Record every qualifying candle rather than selecting attractive screenshots. The sample should include different instruments, volatility regimes and losing outcomes.
- Choose one market and timeframe.
- Define the candle anatomy numerically.
- Define “after an advance” and the resistance condition.
- Select one confirmation and one invalidation rule.
- Include spread, commission and realistic slippage.
- Record maximum adverse and favorable excursion.
- Separate in-sample exploration from out-of-sample evaluation.
Useful outputs include sample size, win rate, average win, average loss, expectancy, drawdown and the percentage of signals skipped by confirmation. A high win rate alone is not enough if losses are much larger than wins. Results from one symbol or market regime should not be presented as universal evidence.
Does volume improve the pattern?
Volume may add context, but its meaning depends on the market. Centralized exchange volume and broker-specific tick volume are not identical datasets. A high-volume rejection can show active participation, while low activity can make a long wick less reliable. Volume should therefore be defined and tested as a separate filter rather than described as automatic confirmation.
Timeframe and execution considerations
On very short timeframes, spread and a single quote change can materially alter the candle shape. A pattern visible on one broker feed may not be identical on another because session boundaries and price aggregation differ. Higher timeframes reduce some microstructure noise but create wider invalidation distances. Position size must adapt to the stop distance; the timeframe should not be chosen only because the chart looks cleaner.
Pre-trade checklist
- Was there a measurable advance before the candle?
- Is the candle at a pre-marked resistance or failed breakout?
- Does it meet the written body and shadow rule?
- Has the selected confirmation occurred?
- Where is the objective invalidation level?
- Is the first target supported by market structure?
- Do spread, slippage and scheduled events change the setup?
- Is position size based on the amount at risk?
When should the setup be rejected?
Reject the setup when the candle forms in an undefined mid-range location, confirmation never occurs, price accepts above the rejected high, or the stop-to-target relationship becomes unrealistic after costs. Also skip it when the data feed shows an isolated spike that cannot be confirmed elsewhere. A valid-looking candle does not create an obligation to trade.
FAQ
Is a Gravestone Doji always bearish?
No. Its meaning depends on prior direction, location and confirmation.
What confirms a Gravestone Doji?
A rule may require a close below its low, a structure break or a failed retest. Choose one before testing.
What timeframe works best?
No timeframe is universally best. Very small timeframes are more sensitive to spread and random movement.
Is it the same as a Shooting Star?
No. They can look similar, but a Doji has nearly equal open and close, while a Shooting Star normally has a visible body.
Where should the stop go?
Many rule sets use a level beyond the rejected high, adjusted for structure and execution. Position size should adapt to the distance.
Sources and methodology
This guide describes candlestick structure and a testable confirmation workflow. Pattern labels are community conventions rather than guaranteed forecasting tools. Readers should verify definitions on their own data and record all signals, including failures.
Risk notice: This article is educational, not investment advice or a trading signal. Trading can cause capital loss. Examples are hypothetical, and past performance does not guarantee future results.