


SNR level invalidation is the rule that tells an MSNR trader when a support or resistance zone should no longer be used for a trade idea. A level can look clean when it is first drawn, but markets change. Price may break through the zone, accept beyond it, retest it from the other side, or chop through it so many times that the original story is gone.
This guide is written for beginner to intermediate retail traders who use support and resistance inside an MSNR workflow. The promise is simple: define rules for deleting levels and avoiding stale setups before they become emotional trades. The goal is not to predict every reversal. The goal is to know when a zone is no longer valid enough to build a trade around.
For the complete framework, read the full MSNR trading strategy guide. You can also connect this topic with what MSNR trading means, the best timeframes for drawing MSNR levels, and MSNR chart setup.
Trading involves risk. This article is educational only and is not financial advice, investment advice, or a signal to buy or sell any market. No SNR zone can guarantee a profitable trade. Always define invalidation, use stop-loss logic, and test your rules in your own market conditions.
Author and review note: Written by the HocLamTrader Editorial Team for educational chart study. Updated May 21, 2026. Examples are conceptual, not live trade recommendations, and every rule should be forward tested with your own timeframe, spread, volatility, session, and execution conditions.
What SNR Level Invalidation Means in MSNR
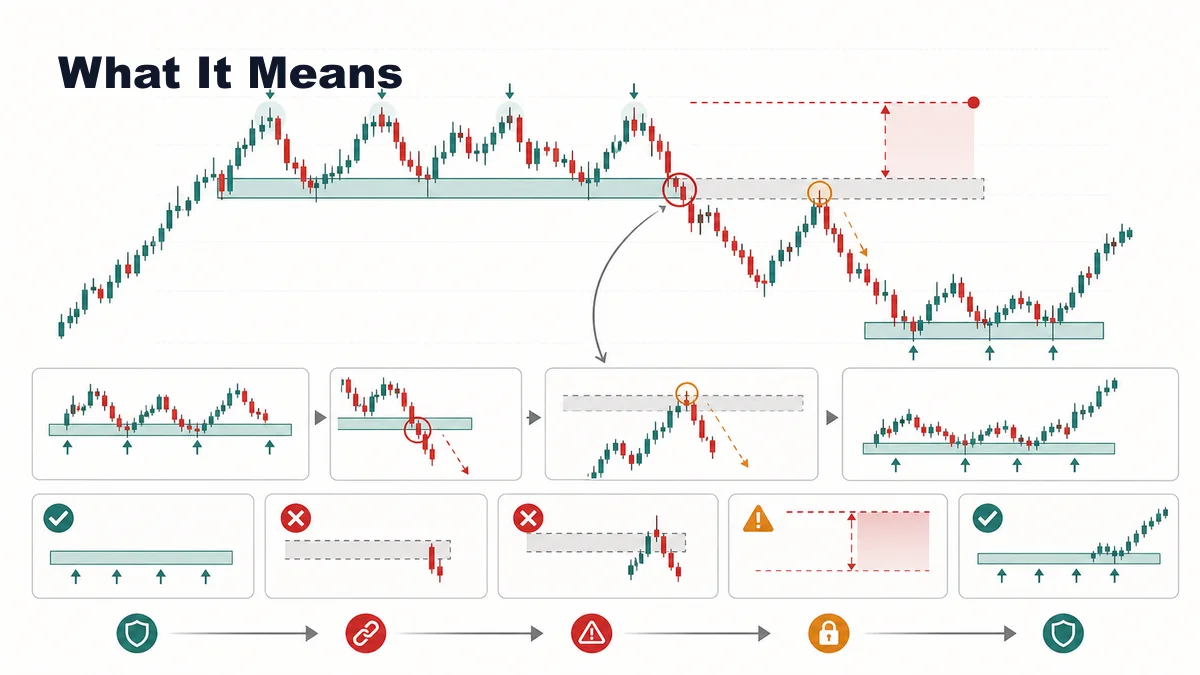
In MSNR, support and resistance are usually treated as zones rather than exact lines. A support zone is an area where buyers previously reacted. A resistance zone is an area where sellers previously reacted. A valid zone is one that still has a clear reason to matter: price has respected it, the surrounding structure supports it, and the trade idea has a logical failure point.
SNR level invalidation happens when the market gives enough evidence that the zone should no longer be trusted as the same decision area. This does not mean price can never react there again. Markets can revisit old levels many times. It means the original MSNR setup based on that level is no longer valid enough to trade without a new reason.
A broken SNR level can become invalid in several ways. Price may close decisively beyond the zone and continue. Price may retest the zone from the other side and accept there. Price may slice through the area repeatedly until the zone becomes noise. Or the higher timeframe context may change so much that the level no longer controls the trade idea.
For example, a support zone may be valid while price holds above it and buyers respond. If price breaks through support, retests it from below, and then rejects lower, the old long idea is invalid. The zone might now act as resistance, but that is a new setup, not the same support trade.
The key phrase is “the original idea.” Invalidation is not a punishment and it is not a prediction. It is the moment when the reason for your trade no longer applies. A disciplined MSNR trader deletes, fades, or relabels the zone instead of forcing the chart to keep supporting an outdated plan.
There is also a difference between a level being “tested” and a level being “invalidated.” A test means price returned to the zone and reacted in a way that still leaves the original story open. Invalidation means price changed the story. For example, a support wick that quickly rejects may be a test. A support break that closes below, retests from underneath, and starts building lower highs is a stronger invalidation signal.
Why It Matters Before Taking a Trade
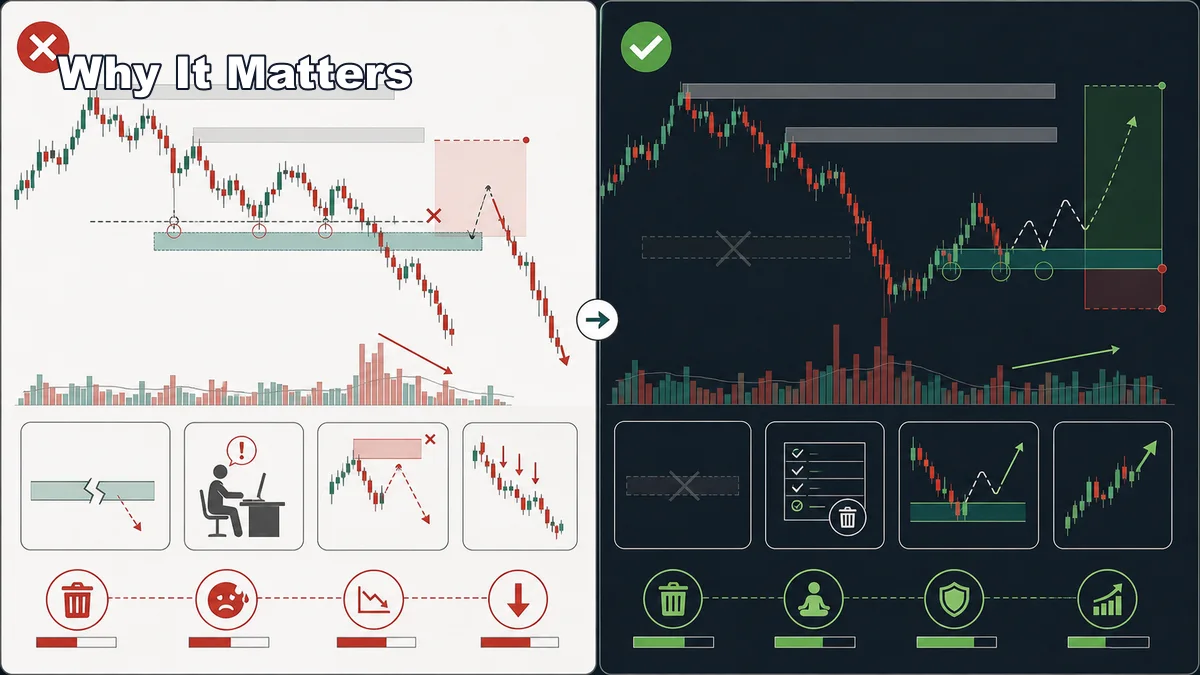
SNR level invalidation matters because stale levels create false confidence. A beginner may draw a support zone, watch price break it, and still look for buys because the line is still on the chart. The chart object stays in place, but the market behavior has changed. That is how a level becomes a trap.
The first reason it matters is trade location. A valid zone gives the trader a reason to watch price. An invalid zone gives the trader a reason to be cautious. If price has already accepted beyond the zone, a fresh entry from the old side may have poor location, unclear risk, and limited follow-through.
The second reason is stop-loss logic. A good stop should be connected to the trade idea. If the idea is that support should hold, then a decisive break of that support may be invalidation. If price has already broken the area before entry, placing a stop around that old support often becomes random. You are no longer protecting a clear thesis.
The third reason is emotional control. Traders often become attached to levels they drew earlier. They may think, “This zone worked before, so it should work again.” MSNR should not work that way. A level can lose quality after too many tests, after a strong break, or after the broader market structure changes.
The fourth reason is review quality. If you do not define invalidation rules, every failed setup can be explained away after the fact. A written rule lets you review honestly: did price invalidate the zone before entry, during entry, or after entry? That question improves your testing more than a vague win-loss record.
It also prevents “level loyalty.” Traders sometimes stay loyal to a zone because it worked once. But a zone that created a strong bounce last week may be weak today if it has been hit repeatedly or if the larger market has changed direction. MSNR is useful only when the trader updates the map as new evidence appears.
Step-by-Step Chart-Reading Workflow
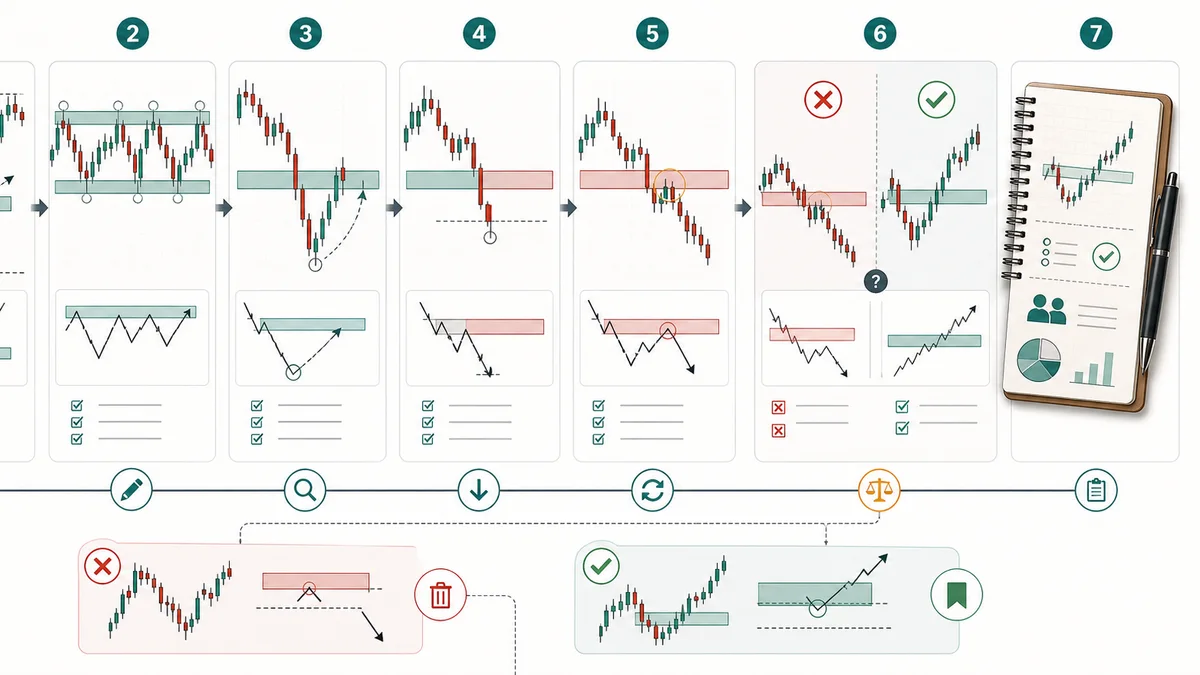
Use this workflow before taking an MSNR trade from any support or resistance zone. The purpose is to decide whether the zone still deserves attention or should be removed from the active plan.
- Start with the higher timeframe. Ask whether the level belongs to the current market structure or only to old noise. Major zones should still connect to the broader chart.
- Check the original reaction. A strong move away from the zone gives it initial quality. A weak reaction or messy overlap gives it less value from the start.
- Count meaningful tests. A zone can survive more than one touch, but repeated chops through the same area reduce clarity.
- Watch acceptance beyond the zone. A wick through the area may not invalidate it. A close, hold, and retest beyond the zone is stronger evidence.
- Compare the current structure. If support breaks and price starts forming lower highs below it, the old support idea is weaker. If resistance breaks and holds as support, the old short idea is weaker.
- Decide before entry. Mark the zone as active, inactive, or flipped. Do not wait until the trade is losing before deciding what invalidation means.
- Journal the decision. Save a screenshot showing why you kept, deleted, or flipped the level. This creates usable test data.
A practical rule is to keep fewer active zones. If a chart has ten faded lines, three old zones, two possible flips, and no clear plan, the trader is likely reacting to clutter. Delete weak levels so the important ones can stand out.
One way to make this practical is to use a three-label system. Active means the level is still clean enough to plan around. Watch-only means the level may matter but needs fresh confirmation. Deleted means the level should not be used for an entry unless a completely new setup forms there. This keeps the chart from becoming a museum of old ideas.
Entry, Invalidation and Stop-Loss Logic
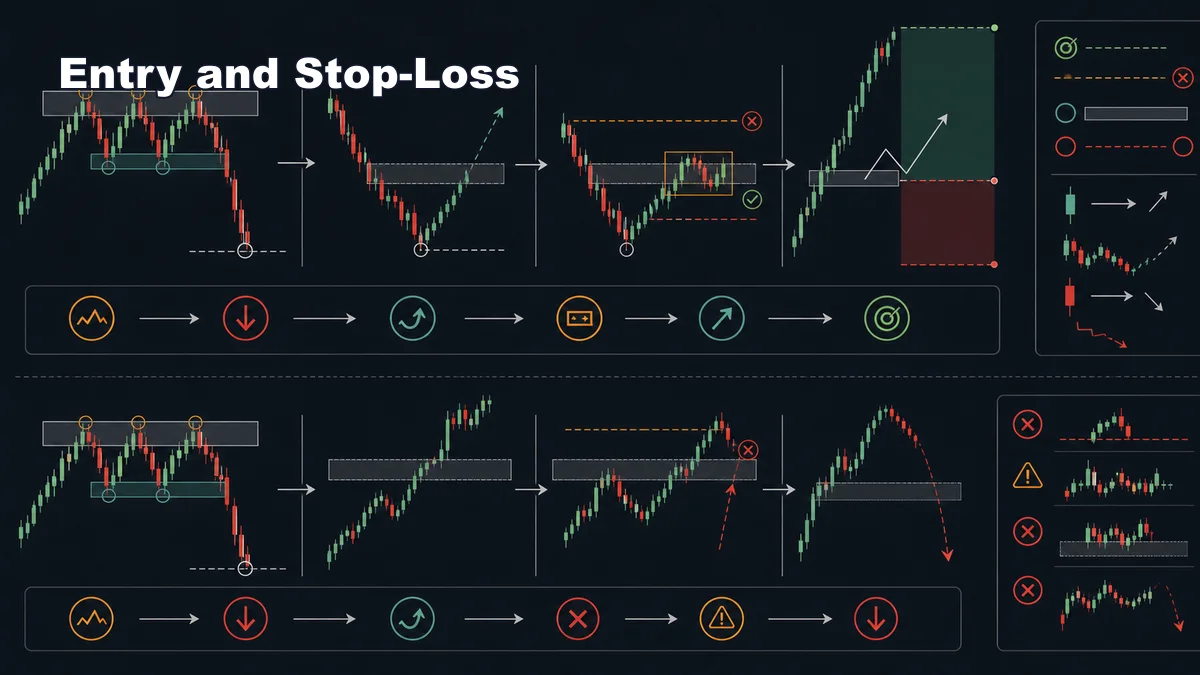
Entry, invalidation, and stop loss should not be separate decisions. In a clean MSNR plan, all three come from the same story. The zone gives the location. The reaction gives the entry reason. The invalidation point tells you where the story is wrong. The stop loss should be placed around that failure point with enough room for normal noise.
For a long setup, the trader may mark a support zone and wait for price to return. If price rejects the zone, forms a higher low, or breaks a small resistance after the reaction, that may create an entry trigger. The invalidation might be a decisive break below the support zone or below the reaction low. The stop loss should not be so tight that normal wicks remove the trade before the idea has actually failed.
For a short setup, the same logic is reversed. The trader marks resistance, waits for a seller reaction, and looks for confirmation such as a lower high, rejection candle, or break of minor support. The invalidation might be a decisive break and hold above resistance. If price has already accepted above the resistance before entry, the old short setup should be deleted or relabeled.
A broken SNR level can still be useful as a flip level. Old support may become resistance. Old resistance may become support. But the flip needs its own confirmation. Do not assume that every broken level automatically flips. Price must show acceptance, retest behavior, and a tradable reaction.
Risk-first traders also compare the stop with the target. If invalidation is far away and the nearest target is close, the trade may not be worth taking even if the zone is technically valid. The goal is not to prove the level exists. The goal is to find a trade that can be managed responsibly.
When backtesting, record whether the stop was placed beyond true invalidation or merely beyond a convenient candle. This detail matters. A tight stop can make a setup look attractive on paper, but if it sits inside the normal noise of the zone, the trade may be poorly designed. A wider stop may be more logical, but if it destroys reward-to-risk, the trade may need to be skipped.
Common Mistakes and Checklist
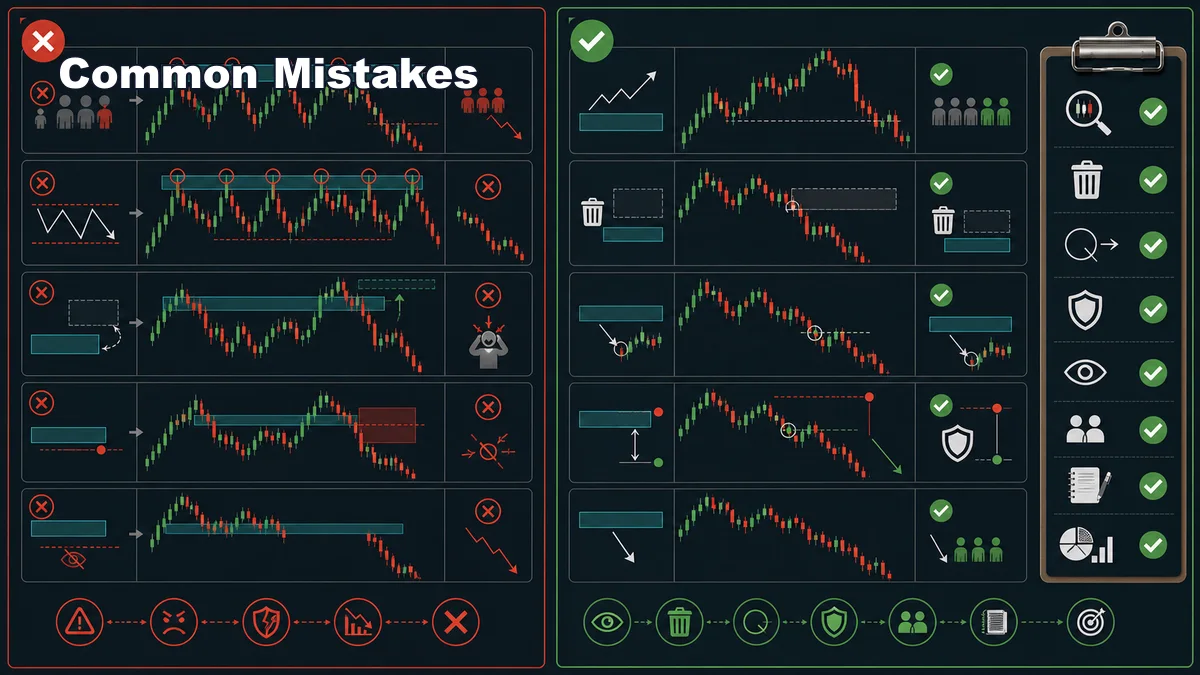
The most common mistake is keeping every level forever. A chart full of old SNR zones makes every candle look important. When every area matters, no area matters. MSNR requires selectivity.
- Ignoring acceptance: a clean close and hold beyond a zone is stronger than a single wick.
- Moving the zone after entry: adjusting the level to keep a losing idea alive destroys the test data.
- Calling every break a fakeout: some breaks are real. Wait for evidence before assuming price will return.
- Using stale levels for new trades: if the original reaction is no longer relevant, the setup needs a new reason.
- Placing stops inside normal noise: stop loss should reflect invalidation, not only the smallest possible loss.
- Skipping screenshots: without screenshots, it is hard to know whether the zone was truly invalid before the trade.
Use this quick checklist before entry:
- Is the SNR zone obvious on the timeframe that controls the trade?
- Has price already accepted beyond the zone?
- Has the zone been tested so often that it is no longer clean?
- Is the current reaction strong enough to plan around?
- Can I define invalidation before entry?
- Does the stop-loss location match the invalidation logic?
- Is there enough room to target after risk is included?
Read the Full MSNR Guide: Continue with the full MSNR trading strategy guide for the complete support-resistance workflow, checklist, examples, and related MSNR subtopics.
FAQ
What is SNR level invalidation?
SNR level invalidation is the point where price behavior proves a support or resistance zone no longer supports the original trade idea. It may happen after a decisive break, acceptance beyond the zone, repeated chop, or a change in market structure.
Should I delete every broken SNR level?
No. Some broken levels can become flip zones, but they should be relabeled and tested as a new idea. Do not keep trading the old support or resistance thesis after it has been invalidated.
Is a wick through support or resistance enough to invalidate it?
Usually not by itself. A wick can be a liquidity probe or rejection. Invalidation is stronger when price closes beyond the zone, holds there, retests from the other side, or changes structure away from the original idea.
Connect this setup to the wider framework
Invalidation becomes clearer when the zone is drawn with one repeatable method. Review MSNR close and open levels, the level-drawing workflow, and fresh-versus-tested quality.
After price reaches the area, distinguish a failed reaction from a true break with breakout and fakeout rules, RBS/SBR role reversal, and close-based confirmation.
Sources and limits
General market-risk and technical-analysis references:
Strategy labels and chart examples are interpretive; they are not standardized signals and do not guarantee outcomes.