


Volume support resistance MSNR is the idea of using volume as an extra context layer when price reaches a support or resistance zone. Many beginners ask whether volume must confirm every MSNR setup. The practical answer is no. Volume can help, but it should not replace price location, reaction, invalidation, stop-loss logic, and risk management.
This guide explains how to think about volume around SNR zones without turning it into another rigid signal. The promise is simple: volume can support the story, but MSNR still starts with a meaningful zone and a clear price reaction. If volume creates more confusion, the trader should simplify rather than force it.
For the complete support-resistance framework, read the full MSNR trading strategy guide. You can also connect this topic with what MSNR trading means, MSNR chart setup, and SNR level invalidation.
Trading involves risk. This article is educational only and is not financial advice, investment advice, or a signal to buy or sell any market. Volume does not guarantee confirmation. Always define invalidation, use stop-loss logic, size positions responsibly, and test rules in your own market conditions.
Author and review note: Written by the HocLamTrader Editorial Team for educational chart study. Updated May 21, 2026. Examples are conceptual and should be forward tested with your own market, broker feed, timeframe, spread, volatility, session, and execution conditions.
What Volume Support Resistance MSNR Means in MSNR
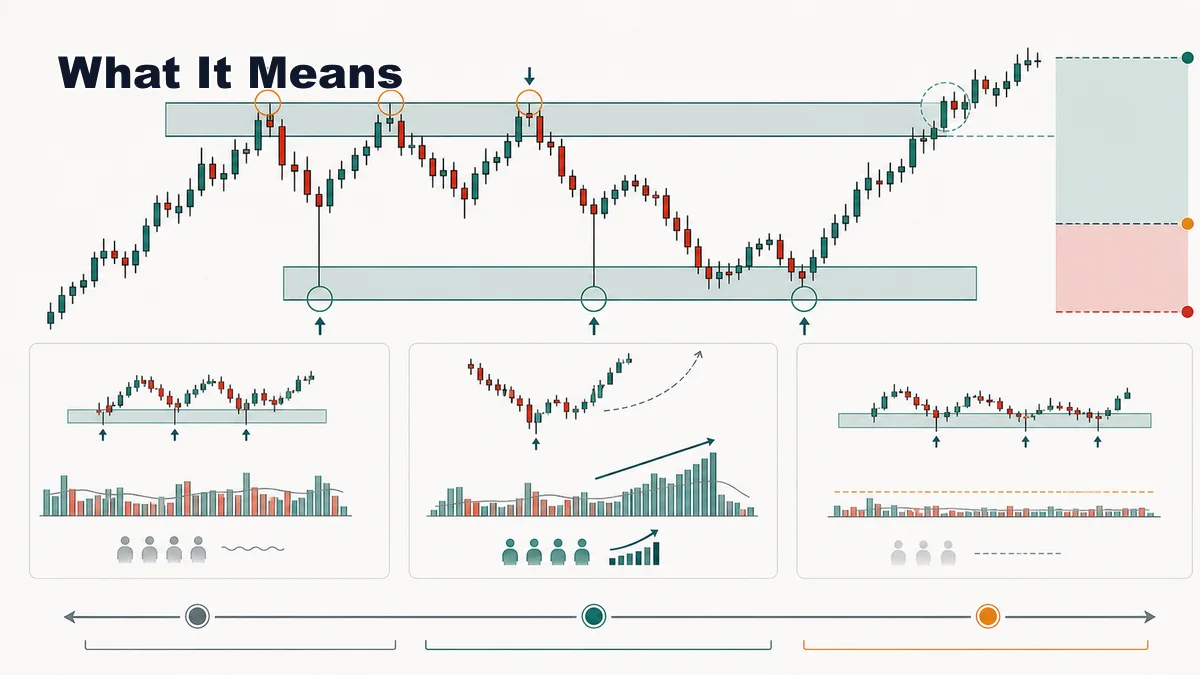
In MSNR, support and resistance zones are the main decision areas. A trader marks where price previously reacted, then waits to see what happens when price returns. Volume can add information about participation. It may show whether the reaction happened with more activity, less activity, or a clear change from the recent baseline.
Volume is not the same across every market. Stocks and futures usually have exchange-traded volume. Forex spot charts often show tick volume from the broker feed, which can be useful but is not the same as centralized exchange volume. Crypto volume can vary by exchange. This is why volume should be treated as context, not a universal rule.
A volume-supported MSNR reaction might show price reaching support, rejecting lower prices, and printing higher-than-normal volume during the response. That can suggest stronger participation around the zone. A low-volume pullback into support might suggest selling pressure is weak, but it still needs price confirmation. A high-volume break through support might suggest the level is failing, but the trader should watch acceptance and retest behavior before deciding.
The key is comparison. Volume only means something relative to recent activity, the session, the market, and the type of move. A volume spike during a news candle is different from a controlled increase during a normal session. A volume bar should not be read in isolation.
For beginners, the cleanest rule is this: mark the SNR zone first, read price reaction second, then use volume as a supporting clue. If the zone is weak or the reaction is unclear, volume alone should not rescue the trade.
Think of volume like a conversation around the level. It can tell you whether more activity appeared, whether a move happened quietly, or whether participation changed around a breakout or rejection. But the chart still needs a location and a plan. A loud conversation in the middle of nowhere is still not a trade setup.
Volume can also be different depending on the session. A New York session reaction may naturally show more participation than a quiet overnight move. A futures contract may show a different volume rhythm near the open and close. A crypto pair may show exchange-specific volume patterns. This is why volume rules should be tested in the exact market you trade.
Why It Matters Before Taking a Trade
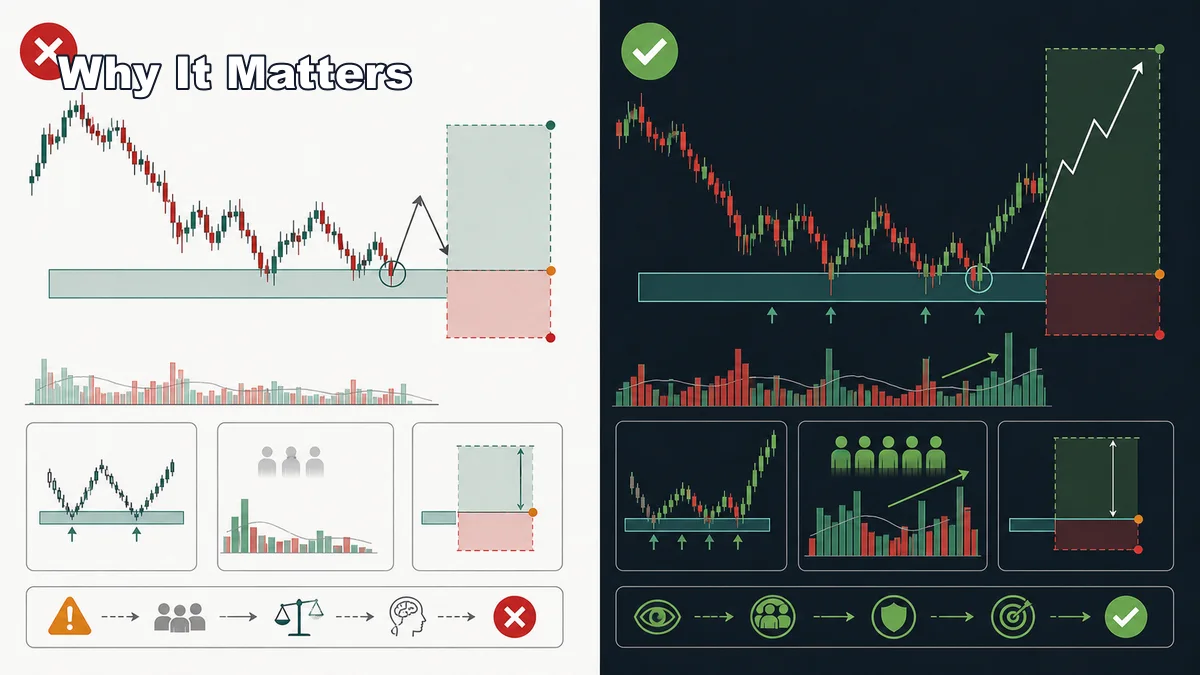
Volume matters before taking a trade because it can help traders understand participation around a zone. If price reaches resistance and rejects with a strong bearish candle on increased volume, the reaction may deserve more attention than a tiny candle on quiet activity. If price breaks support on expanding volume and then accepts below it, the old support idea may be weaker.
However, volume matters less than many beginners think. A clean price reaction from a major zone can be useful even when volume is average. A volume spike can also be misleading if it appears during news, at the end of a move, or inside a messy range. The trader should not require volume confirmation so strictly that they ignore clear price behavior.
The best use of volume is as a question, not an answer. Is participation increasing as price rejects the zone? Is volume drying up during a pullback into support? Is a breakout happening with enough participation to suggest acceptance? Is a volume spike showing exhaustion rather than continuation? These questions improve chart reading without making volume a magic filter.
Volume can also improve risk awareness. A level that breaks on strong activity and then retests from the other side may deserve more caution. A level that rejects with clear participation may give the trader a better reason to watch for a trigger. But the stop loss still comes from invalidation, not from the volume bar.
Another reason volume matters is review quality. If you record volume context in your journal, you may learn whether your best MSNR trades usually had clear participation, quiet pullbacks, or no useful volume clue at all. That test data is more valuable than copying a rule that says every setup must have a volume spike.
Volume also helps you ask better questions after a failed trade. Did the level fail on increasing participation? Did the bounce happen on weak activity? Did a news candle distort the read? Did volume look supportive, but price never confirmed? These review questions make the tool useful without turning it into a guarantee.
Step-by-Step Chart-Reading Workflow
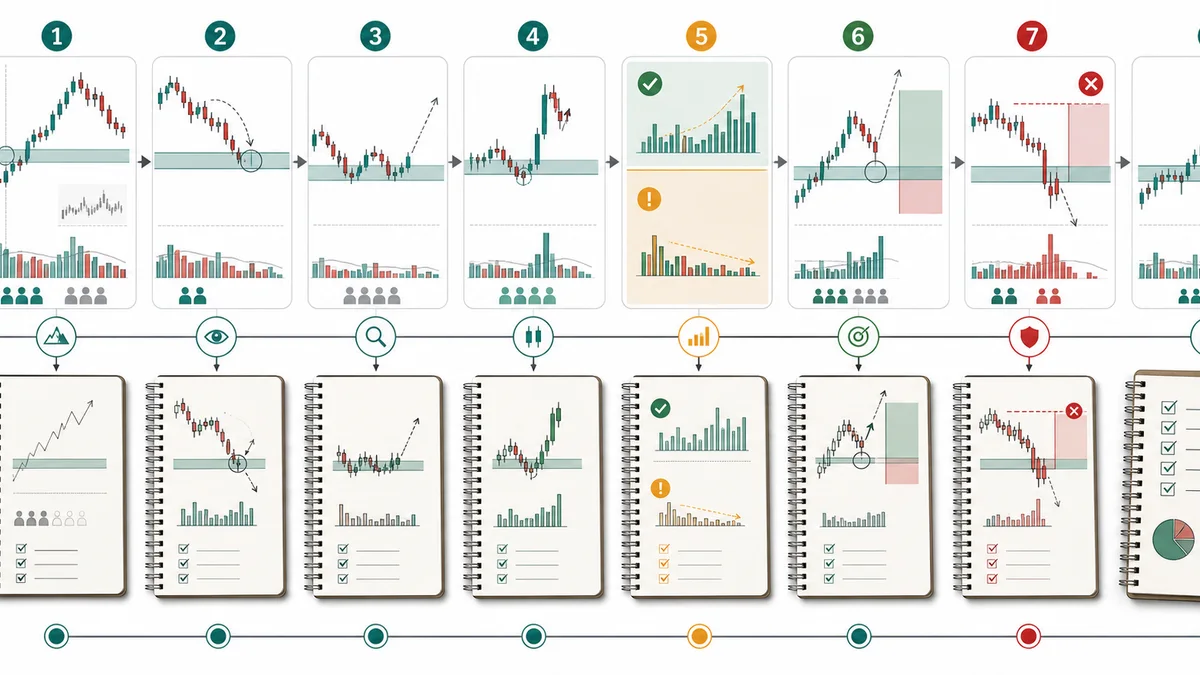
Use this workflow when deciding whether volume should influence an MSNR trade. The order matters because volume should support the SNR read, not replace it.
- Map the major SNR zones first. Start with higher-timeframe support and resistance, range boundaries, old breakout levels, and areas where price previously reacted with strength.
- Define the market context. Decide whether price is trending, ranging, transitioning, or approaching a major obstacle. Volume has different meaning in different environments.
- Set a volume baseline. Compare current volume with recent candles from the same session or similar market condition. Do not compare a quiet Asian session candle with a major news spike.
- Wait for price to reach the zone. Volume matters most when price is at a decision area. Volume in the middle of nowhere is usually less helpful.
- Read the price reaction first. Look for rejection, acceptance, breakout, retest, higher low, lower high, or structure shift.
- Add volume context second. Ask whether the reaction had unusual participation, fading pressure, or a volume profile that supports the price story.
- Define invalidation and stop loss. A volume clue does not replace the level where the trade idea is wrong.
- Journal the result. Record whether volume helped, confused, or added no value. Over time, this becomes your own evidence.
If volume conflicts with price, choose caution. For example, a support zone may reject cleanly, but if the broader structure is bearish and the reaction is weak, a volume spike does not automatically make it a strong long. The entire setup must still make sense.
A practical journal field is enough for most learners. Instead of building a complex volume system, record one short note: normal, rising, fading, spike, or unclear. Then record whether that note helped the trade decision. After a sample of trades, you can see whether volume is actually improving your MSNR process.
Entry, Invalidation and Stop-Loss Logic
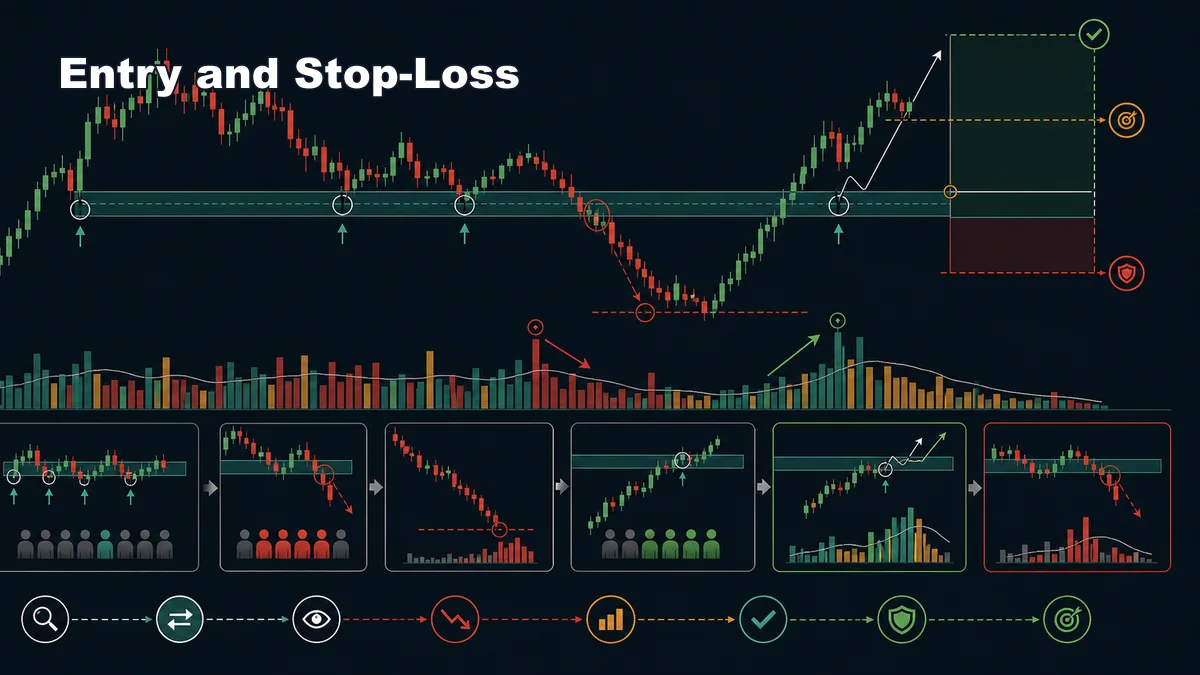
Entry, invalidation, and stop loss should remain price-based. Volume can help judge the quality of a reaction, but it should not decide the stop by itself. If a long idea depends on support holding, invalidation usually belongs below the support zone, below the reaction low, or below the structure that confirmed the bounce. If a short idea depends on resistance rejecting, invalidation usually belongs above the resistance zone, above the reaction high, or above the structure that confirmed the rejection.
For a long setup, imagine price pulls into a support zone on declining volume, rejects the zone, then breaks a small lower-timeframe resistance. The lower volume on the pullback may suggest sellers are losing pressure, while the reaction gives the actual trigger. The stop still needs to be placed around the level that would prove the support idea wrong.
For a short setup, imagine price pushes into resistance with a final strong candle and high volume, then fails to hold above the zone. If price breaks down and retests the zone from below, volume may support the exhaustion story. But the trade still needs a visible invalidation point above the rejection high or above the retest area.
Volume should never be used to avoid a stop loss. A trader might think, “Volume confirms my idea, so I can give it more room.” That is dangerous. Confirmation does not remove uncertainty. A setup with better volume context still needs position sizing and a maximum loss plan.
Also remember that some markets have less reliable volume data. In forex, many platforms show tick volume. It can approximate activity, but it is broker-specific. In crypto, volume varies between exchanges. In stocks and futures, volume may be cleaner but still affected by news, opening sessions, and closing auctions. This is why the stop should follow price invalidation, not the volume bar.
For this reason, volume should not decide position size by itself. A setup with strong volume still needs a fixed risk limit. A setup with average volume may still be tradable if the zone, reaction, invalidation, and target are clean. Position size should come from account risk and stop distance, not from excitement about one volume candle.
If you use volume tools such as a moving average of volume, volume profile, or session volume comparison, keep them secondary. The tool should answer one question: is participation around this SNR zone unusual enough to matter? If it does not answer that question clearly, remove it from the chart.
Common Mistakes and Checklist
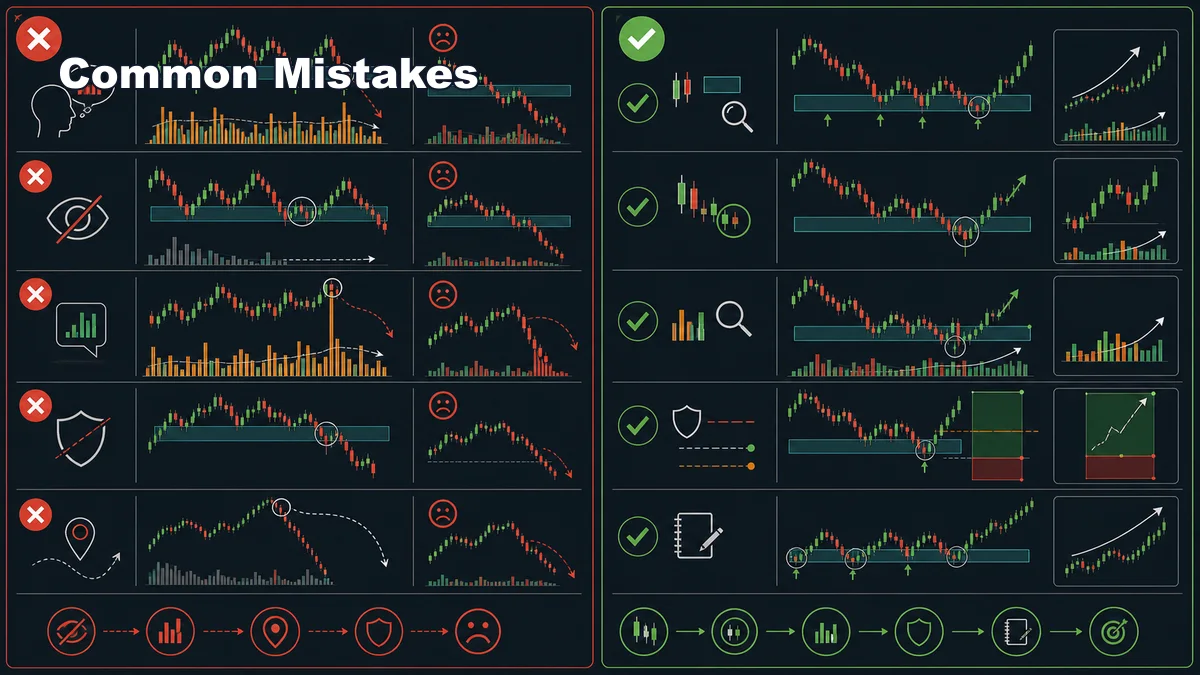
The most common mistake is thinking volume must confirm every MSNR setup. This can lead to overfiltering, hesitation, and missed learning. The opposite mistake is treating any volume spike as proof. Both extremes are weak. Volume is useful only when it clarifies the price story.
Another mistake is changing the volume rule after seeing the outcome. If the trade wins, the trader says volume confirmed it. If the trade loses, the trader says volume was not clear enough. That kind of review does not create skill. Define the volume note before entry, then judge it honestly after the trade.
- Making volume mandatory: some valid price reactions happen without dramatic volume expansion.
- Ignoring market type: tick volume, exchange volume, and session volume are not the same.
- Reading spikes as certainty: high volume can show participation, exhaustion, stop runs, or news volatility.
- Ignoring price reaction: volume without a meaningful SNR zone is usually not enough for an MSNR setup.
- Forgetting invalidation: a volume clue does not tell you where the trade idea is wrong.
- Comparing unfair sessions: volume should be compared with similar time periods and conditions.
- Adding too many indicators: if volume tools clutter the chart, the MSNR map may become harder to read.
Use this quick checklist before entry:
- Is price at a meaningful support or resistance zone?
- Is the price reaction clear without volume?
- Does volume add useful context or only noise?
- Am I comparing volume with a fair baseline?
- Does the market have reliable volume data for this use?
- Can I define invalidation before entry?
- Does the stop-loss location come from structure rather than volume?
Read the Full MSNR Guide: Continue with the full MSNR trading strategy guide for the complete support-resistance workflow, checklist, examples, and related MSNR subtopics.
FAQ
Does volume need to confirm every MSNR trade?
No. Volume can add context, but MSNR should still begin with support and resistance, price reaction, invalidation, and risk. Some clean setups do not have dramatic volume confirmation.
What does high volume at support or resistance mean?
High volume means participation increased, but it does not guarantee direction. It may show rejection, absorption, exhaustion, breakout participation, or news volatility. Read it with price behavior and context.
Can I use MSNR without volume?
Yes. MSNR can be traded as a price-action support and resistance framework without volume. If your market has unreliable volume data, focus more on zones, reaction, structure, invalidation, and risk.
Connect this setup to the wider framework
Volume is a secondary input rather than a substitute for location. Begin with MSNR support quality, MSNR resistance quality, and zone state.
Then compare volume behavior with breakout confirmation, candle confirmation, and the broader technical-indicator framework without treating any single reading as conclusive.
Sources and limits
General market-risk and technical-analysis references:
Strategy labels and chart examples are interpretive; they are not standardized signals and do not guarantee outcomes.