


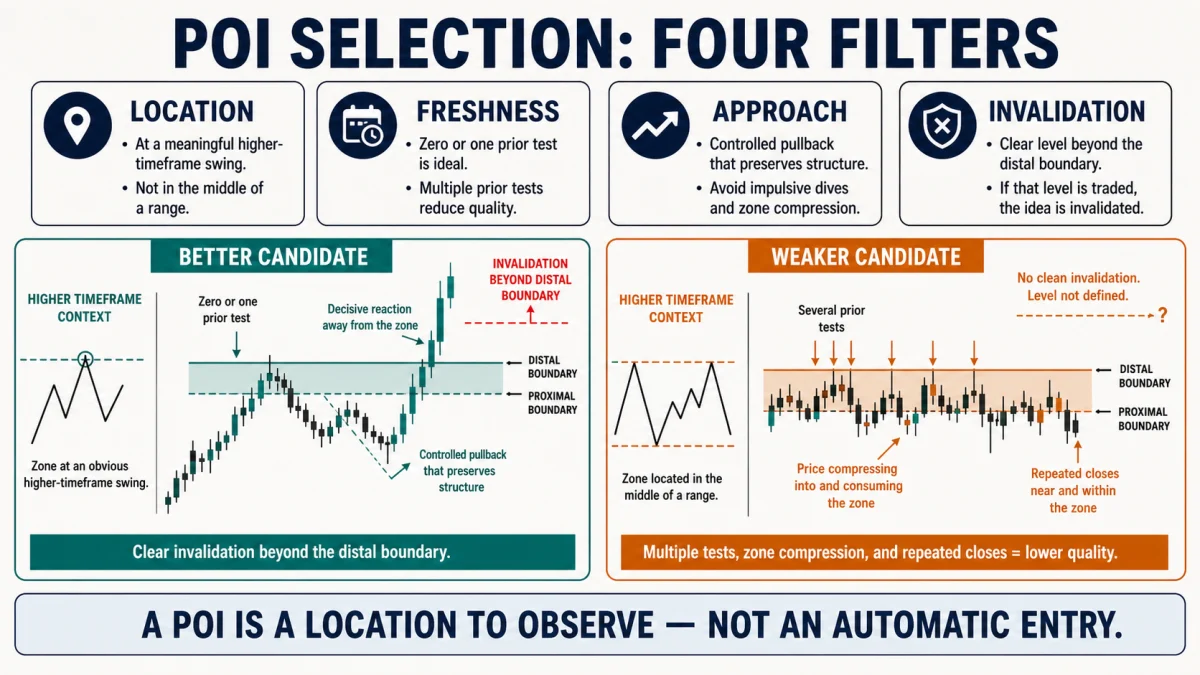
Alchemist POI selection is a process for ranking chart locations before looking for an entry. A practical point of interest should be evaluated through four filters: location in higher-timeframe structure, freshness or prior testing, the way price approaches the area, and whether the idea has a clear invalidation point. A POI is not automatically high quality because price reacted there once. A zone in the middle of a range, repeatedly tested, compressed into, or too wide for coherent risk may be a poor candidate. Selection should happen before the reaction so the trader can test the rule without hindsight.
Key takeaways
- Location matters more than a visually perfect rectangle.
- Freshness should be defined by counted tests, not intuition.
- Approach can preserve or consume a zone.
- Clear invalidation is part of POI quality.
- A higher-ranked POI is still an observation area, not an automatic entry.
POI is a location, not a prediction
A point of interest identifies where additional evidence may matter. It can be a support or resistance zone, a role-reversal level, a prior swing, or another location defined by the trading model. It does not prove that institutions are waiting there, and it does not reveal hidden orders.
CME Group notes that support and resistance may form around previous highs and lows and that such levels should be considered zones rather than exact prices. That supports using boundaries, but not the claim that every boundary will hold.
Begin with the complete POI guide and the proximal and distal boundary guide. This article focuses specifically on choosing among several candidates.
Filter 1 and 2: location and freshness
Location asks whether the POI sits at a meaningful higher-timeframe feature: a clear swing, the edge of a range, a role-reversal area, or a level aligned with the current structure. A zone in the middle of congestion often offers less informational value because price can cross it in both directions.
Freshness describes prior interaction. Define a test by rule: any wick into the zone, any body close inside it, or a minimum penetration. Different definitions create different datasets. A first return may behave differently from a third or fourth return, but that hypothesis still needs testing.
Do not erase earlier tests because the later reaction looks clean. Scroll left, count every interaction under the same rule, and record whether the zone was created by displacement, consolidation, or ordinary noise.
Filter 3 and 4: approach and invalidation
Approach describes the structure leading into the POI. A controlled pullback that preserves higher-timeframe structure is different from repeated small pushes and closes consuming the zone. The article on MSNR compression into a zone explains why shrinking pullbacks near a boundary may signal pressure rather than a safe reversal.
Fast displacement into a zone is not automatically good or bad. It may produce a sharp reaction, or it may reflect momentum that continues through the level. Record candle range, overlap, closes, gaps, and preserved swings rather than using one adjective.
Invalidation asks whether the thesis has a coherent failure point. If the zone is so wide that a structural stop exceeds the risk plan, or so noisy that no close can clearly disprove the idea, the POI may be analytically interesting but unsuitable for execution.
Step-by-step workflow
- Define the context timeframe and current market state.
- Mark candidate POIs without inspecting the future reaction.
- Record the structural reason for each location.
- Count prior tests using one fixed definition.
- Classify approach as controlled, impulsive, overlapping, or compressive.
- Draw proximal and distal boundaries.
- Mark coherent invalidation and measure distance.
- Rank candidates, then wait for a separately defined trigger.
POI quality filter sheet
| Filter | Better candidate | Caution | Reject or review |
|---|---|---|---|
| Location | HTF swing or range edge | Secondary structure | Middle of noise |
| Freshness | Zero or one defined test | One deep test | Repeated tests |
| Approach | Structure preserved | Fast or mixed | Compression consumes zone |
| Invalidation | Clear and affordable | Wide but measurable | No coherent failure point |
These labels organize review; they do not create a universal probability score.
Worked chart scenario
Assume three H4 demand zones are visible. POI A sits in the middle of a broad range. POI B aligns with a prior H4 swing and has not been retested. POI C aligns with structure but has already received four body-close tests.
POI B ranks highest for observation. Price approaches in a controlled pullback while the D1 higher low remains intact. On H1, a reaction closes back above the proximal edge and later breaks a minor high. The trigger is separate from the POI ranking.
If the distal boundary is 120 pips away and the strategy’s risk limit cannot support a coherent size, the trade is skipped even though the location ranked well. Quality and tradability are related but not identical.

Rank candidates without false precision
A scorecard can improve consistency, but do not pretend a 7/10 POI has a scientifically measured probability. Use categories such as pass, caution, and fail, with written reasons. The purpose is to compare candidates under the same rules.
Keep hard exclusions separate from preferences. A mid-range zone may be a hard exclusion. A first test may be a preference. If every preference becomes mandatory, the sample size can shrink until the model is impossible to evaluate.
After ranking, wait for the trigger defined in the Alchemist workflow. A high-ranked location without confirmation remains only a location.
Common mistakes
- Choosing a zone because the later reaction is visible.
- Calling a level fresh while ignoring earlier wicks.
- Assuming fast approach guarantees rejection.
- Ignoring compression into the zone.
- Making the zone narrower only to improve reward-to-risk.
- Treating a scorecard as a probability calculator.
Screenshot candidates before the test. If the selected POI changes after the reaction, the review contains hindsight.
Risk management and invalidation
A POI should have a logical failure condition beyond its relevant structure. The distal edge is not automatically the stop for every model; the confirming swing or close behavior may invalidate first. Record analytical invalidation, order placement, and any execution buffer separately.
A technical location never determines position size by itself. First define the price behavior that proves the scenario wrong, measure the distance to that point, and only then apply the position-sizing formula. The risk–reward ratio is a planning constraint, not evidence that price is likely to reach the target. If coherent invalidation is too far for the permitted risk, reduce size or skip the trade.
Execution can differ from the chart. Spread, slippage, gaps, news, data-feed differences, and order type can change the result. The CFTC warns that leverage amplifies both gains and losses and that OTC forex customers trade through a dealer-controlled platform. A valid observation can still lead to a losing trade or poor fill.
Pre-trade checklist
- POI was marked before reaction.
- Location has a structural reason.
- Every prior test was counted consistently.
- Approach is described with observable behavior.
- Boundaries and invalidation are clear.
- Trigger and risk remain separate decisions.
How to test the method without hindsight
Test one POI definition at a time. Freeze the chart at the moment the candidate is marked and record every candidate, not only those that later react.
- Define location and freshness rules.
- Capture candidates before touch.
- Advance candle by candle.
- Record approach and trigger outcomes.
- Include skipped candidates and failed zones.
- Compare filters on an unseen period.
Save one screenshot before the decision point and another after the scenario is complete. Record the instrument, session, timeframe, data feed, context, zone definition, trigger, invalidation, next obstacle, spread, slippage, maximum adverse excursion, maximum favorable excursion, and whether the order could realistically have been filled. Keep failed and ambiguous examples; deleting them creates survivorship bias.
Score process separately from outcome. A profitable trade outside the written rules is poor process, while a losing trade that followed a tested plan can remain a valid sample. Use the same definitions for at least 30–50 examples before changing a rule. When a rule changes, date the revision and begin a separate dataset.
When to stand aside
Stand aside when the chart contains many overlapping zones, the candidate is in the middle of a range, prior tests cannot be counted consistently, or the approach has already closed repeatedly through the area.
Skip execution when the POI is technically clear but invalidation is too far, spread is abnormal, or the next obstacle leaves insufficient space. A good location does not override poor risk geometry.
Frequently asked questions
What does POI mean?
Point of interest: a pre-defined chart location where a trader waits for more evidence.
Is the freshest zone always best?
No. Freshness is only one filter; location, approach and invalidation also matter.
How many tests make a zone weak?
There is no universal number. Define and test the count for your model.
Should I enter at the proximal edge?
Only if a separately tested limit-entry model permits it. Otherwise wait for confirmation.
Can a wide POI be valid?
Yes analytically, but it may be unsuitable for execution if coherent risk is too large.
Conclusion
Alchemist POI selection works best as a pre-trade filter. Compare location, freshness, approach, and invalidation before the reaction, then require a separate trigger. The goal is consistent observation, not certainty.
Sources and methodology limits
- CME Group — Support and Resistance, accessed August 2, 2026.
- CME Group — Technical Analysis, accessed August 2, 2026.
- CFTC — Eight Things You Should Know Before Trading Forex, accessed August 2, 2026.
The four-filter scorecard is an editorial framework. Support-and-resistance sources explain the underlying concepts but do not validate a proprietary Alchemist POI method or guarantee predictive value.
Affiliate disclosure: If you need a practice environment, you may review an Exness demo account. This is a sponsored affiliate link, and Học Làm Trader may receive a commission if you register. The link is not a recommendation to open an account. Check costs, product terms, legal availability in your jurisdiction, and suitability before using any service.
Risk warning: This article is for education and general information only. It is not investment advice, a trade signal, or an invitation to trade. Technical analysis is interpretive and can fail without warning. Leveraged trading can cause rapid losses, and past performance does not guarantee future results. Test every rule independently, include realistic costs, assess your ability to bear loss, and take responsibility for your decisions.
Related reading: Alchemist If–Then Trading Plan: Build Two Scenarios