


MSNR candlestick confirmation is the process of using candle behavior around a support or resistance zone to decide whether a trade idea is ready, still forming, or already invalid. The candle is not the whole strategy. It is the execution trigger inside a larger MSNR plan: higher-timeframe context, clean SNR zone, price reaction, invalidation, stop-loss logic, and position sizing.
This guide focuses on three common confirmation ideas: rejection candles, engulfing candles, and close-based entries. These are popular in Malaysian SNR candlestick confirmation discussions because they are easy to see. The danger is that they are also easy to misuse. A rejection candle in the middle of noise is not meaningful. An engulfing candle after an extended move may be exhaustion rather than confirmation. A close-based entry can reduce guessing, but it can also enter late if the trader ignores risk.
For the full MSNR framework, start with the MSNR trading strategy guide. For related background, review candlestick patterns, what MSNR trading means, and SNR level invalidation.
Trading involves risk. This article is educational only and is not financial advice, investment advice, or a signal to buy or sell any market. Candlestick confirmation does not guarantee continuation or reversal. Always define invalidation, use stop-loss logic, size positions responsibly, and test your rules before live trading.
Author and review note: Written by the HocLamTrader Editorial Team for educational chart study. Updated May 21, 2026. The examples are conceptual and should be tested with your own market, timeframe, spread, volatility, session, and execution conditions.
What MSNR Candlestick Confirmation Means in MSNR
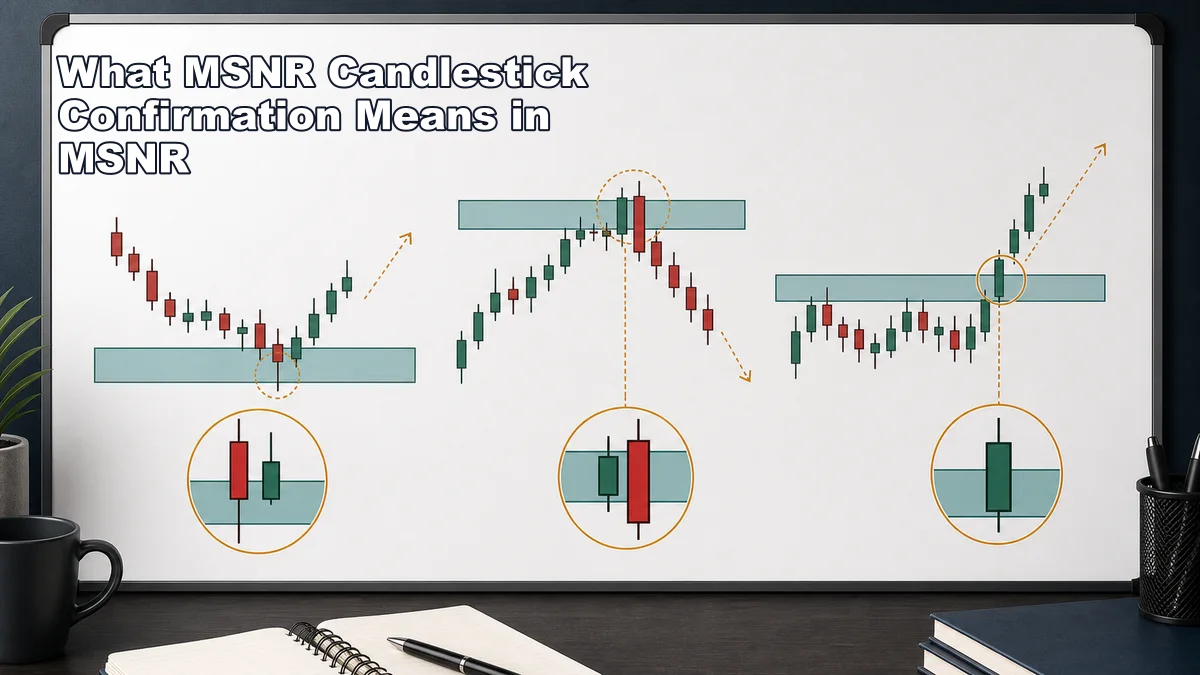
In MSNR, support and resistance zones tell the trader where to pay attention. Candlestick confirmation helps answer what price is doing when it reaches that area. The candle can show rejection, acceptance, failure, continuation, hesitation, or a shift in pressure. The goal is not to memorize candle names. The goal is to understand the behavior behind the candles.
A rejection candle shows that price tried to move through a zone but failed to hold there. At support, a lower wick followed by a close back above the zone may suggest that sellers pushed down but buyers responded. At resistance, an upper wick followed by a close back below the zone may suggest that buyers pushed up but sellers responded. The wick matters, but the close matters too. A long wick with a weak close can mean something different from a long wick with a strong close away from the zone.
An engulfing candle shows a stronger change in candle body control. A bullish engulfing candle near support can suggest that buyers have taken back the previous candle’s body range. A bearish engulfing candle near resistance can suggest that sellers have taken control after a failed push higher. But engulfing candles are not magic. They need location, context, and follow-through. If an engulfing candle appears directly into a higher-timeframe obstacle, the setup may still be poor.
A close-based entry waits for a candle to close before the trader acts. This can help beginners avoid entering during a candle that looks strong at first but reverses before the close. Close-based confirmation can also define invalidation more clearly because the trader can judge whether price actually accepted beyond a level or only wicked through it.
The best way to think about MSNR candlestick confirmation is simple: the zone creates the question, and the candle gives the first answer. If price reaches support, the question is, “Are buyers defending this area, or is support failing?” If price reaches resistance, the question is, “Are sellers defending this area, or is resistance breaking?” The candle should help answer that question, not replace the question.
Confirmation also includes what happens after the signal candle. A rejection candle that gets immediately broken is not the same as a rejection candle that creates a higher low. An engulfing candle that closes strongly but has no room to the next resistance may still be a weak trade. MSNR traders should read the candle, the zone, the structure, and the risk together.
Why It Matters Before Taking a Trade
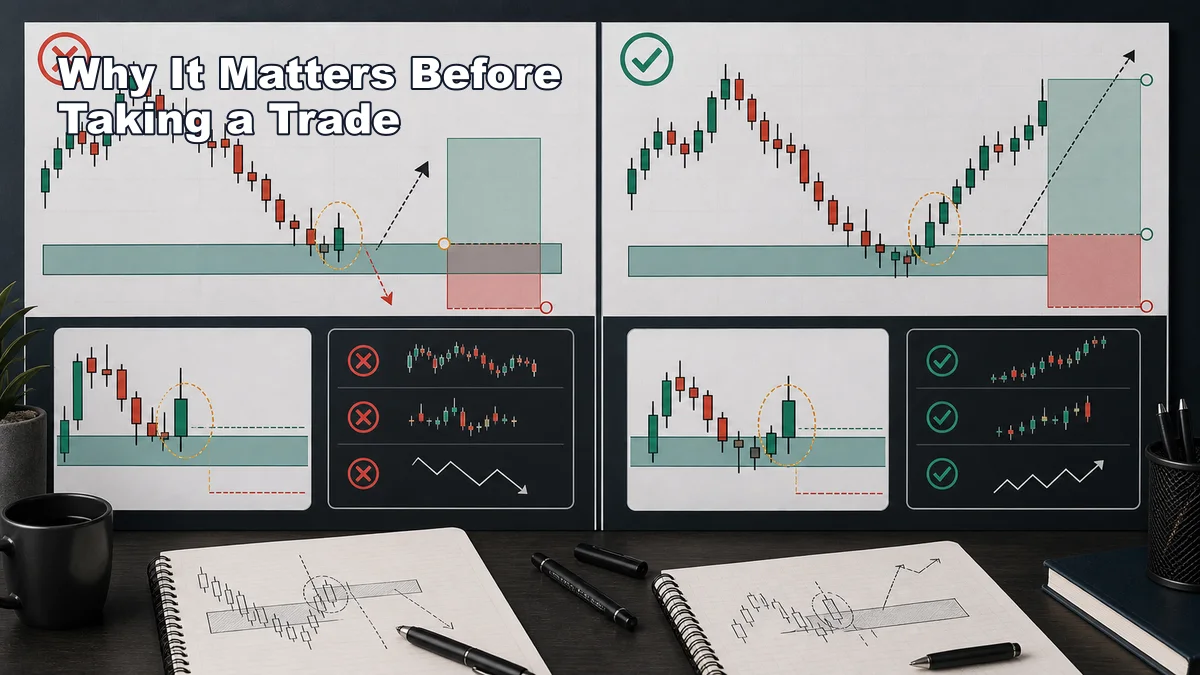
Candlestick confirmation matters before taking a trade because a support or resistance zone alone is not an entry signal. Price can bounce, break, sweep liquidity, retest, or chop around the level. The candle reaction gives the trader evidence about which scenario may be forming.
For beginners, the most useful benefit is patience. Without confirmation, a trader may buy as soon as price touches support or sell as soon as price touches resistance. That can work occasionally, but it often creates weak entries. Waiting for a candle to close or reject gives the trader more information before risking money.
The second benefit is invalidation. A candle pattern can help define the point where the idea is wrong. If a long setup depends on a bullish rejection from support, a break below the rejection low may weaken the setup. If a short setup depends on a bearish engulfing candle from resistance, a close back above that engulfing candle may invalidate the short idea. The candle gives structure to the risk plan.
The third benefit is filtering. Not every level should be traded. If price reaches support with heavy bearish momentum and closes below the zone, a long trade may not be ready. If price reaches resistance but candles keep closing above it, the old resistance may be failing. Confirmation helps the trader avoid forcing reversal trades when the market is showing acceptance instead.
However, confirmation also has limits. Waiting for a close can reduce false starts, but it may increase stop distance. A beautiful engulfing candle can look powerful, but if it closes far away from the zone, the entry may be late. A rejection wick can look dramatic, but it may only be a liquidity sweep before continuation. Every confirmation style has a trade-off.
This is why candlestick confirmation should be risk-first. The trader should ask four questions before entry:
- Is the candle forming at a meaningful MSNR zone?
- Does the candle behavior match the market context?
- Where is the trade idea invalid?
- Can the stop loss and target still make sense after waiting for confirmation?
If those questions are not clear, the candle pattern is not enough. MSNR is not about finding a candle name and entering. It is about using candle behavior to execute a larger support and resistance plan.
Step-by-Step Chart-Reading Workflow
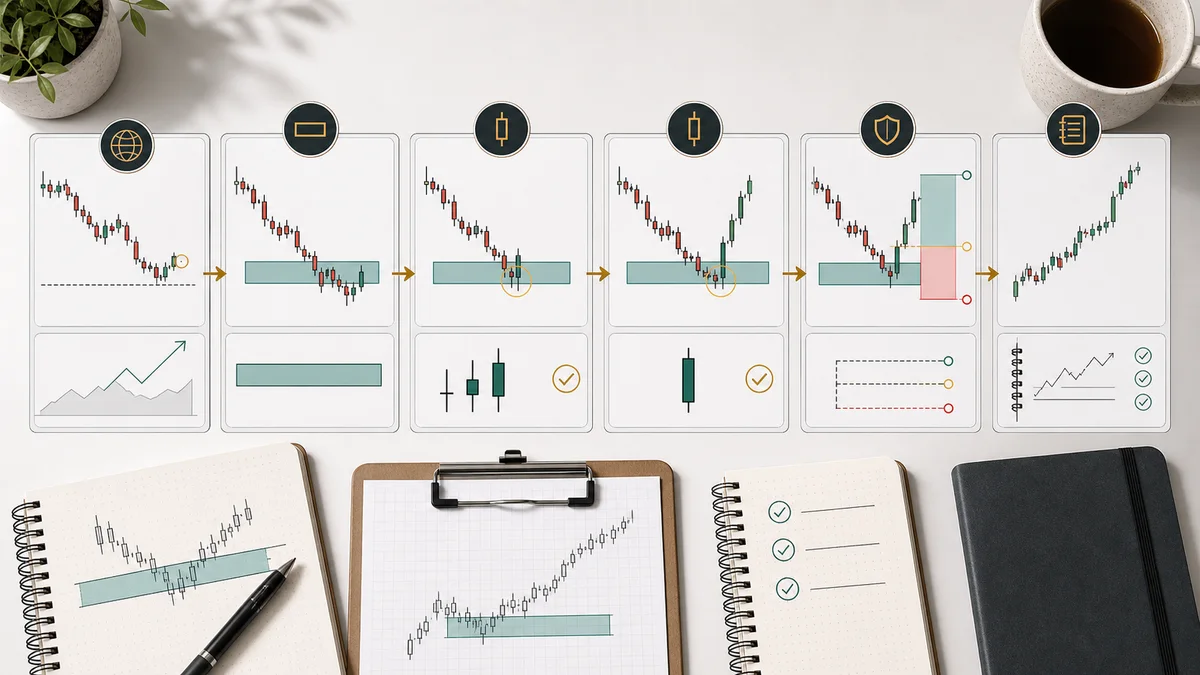
Use this workflow when reading candlestick confirmation around an MSNR zone. The order is important because the candle should confirm the plan, not create the plan from nothing.
- Start with higher-timeframe context. Decide whether the market is trending, ranging, breaking out, or sitting near a major higher-timeframe zone. A bullish candle at support is stronger when it aligns with broader context than when it fights a strong downtrend.
- Mark the cleanest support and resistance zones. Use major swings, range boundaries, old breakout areas, and visible reaction zones. Avoid drawing every small pivot.
- Wait for price to reach the zone. Candlestick confirmation away from a meaningful area is usually less useful. The candle matters because of where it forms.
- Classify the reaction. Is price rejecting the zone, accepting beyond it, failing to continue, or moving through it with strength? Describe behavior before naming the candle.
- Check the candle close. Did the candle close back inside the zone, away from the zone, beyond the zone, or in the middle? The close often tells more than the wick alone.
- Look for follow-through or a lower-timeframe shift. Some traders need the next candle to confirm the reaction. Others need a minor structure break. Choose one rule and test it.
- Define invalidation before entry. Decide whether the setup fails at the candle low, candle high, zone boundary, reaction swing, or acceptance beyond the zone.
- Check reward-to-risk and nearby obstacles. If the candle closes too far from the level, the stop may become wide and the next target may be too close.
- Journal the setup. Screenshot the zone, the confirmation candle, the entry rule, the invalidation point, and the outcome.
This process helps remove emotional pattern chasing. If a bullish engulfing candle appears in the middle of nowhere, the workflow rejects it. If a rejection candle forms at support but closes weakly and has no follow-through, the workflow asks for patience. If a close-based entry gives a valid signal but leaves poor reward-to-risk, the workflow tells the trader to skip.
A useful journal note is to record the confirmation type in plain language: support rejection, resistance rejection, bullish engulfing, bearish engulfing, close back inside range, close beyond zone, failed close, or no confirmation. Over time, this helps you learn which candle behaviors actually improve your MSNR results.
Entry, Invalidation and Stop-Loss Logic
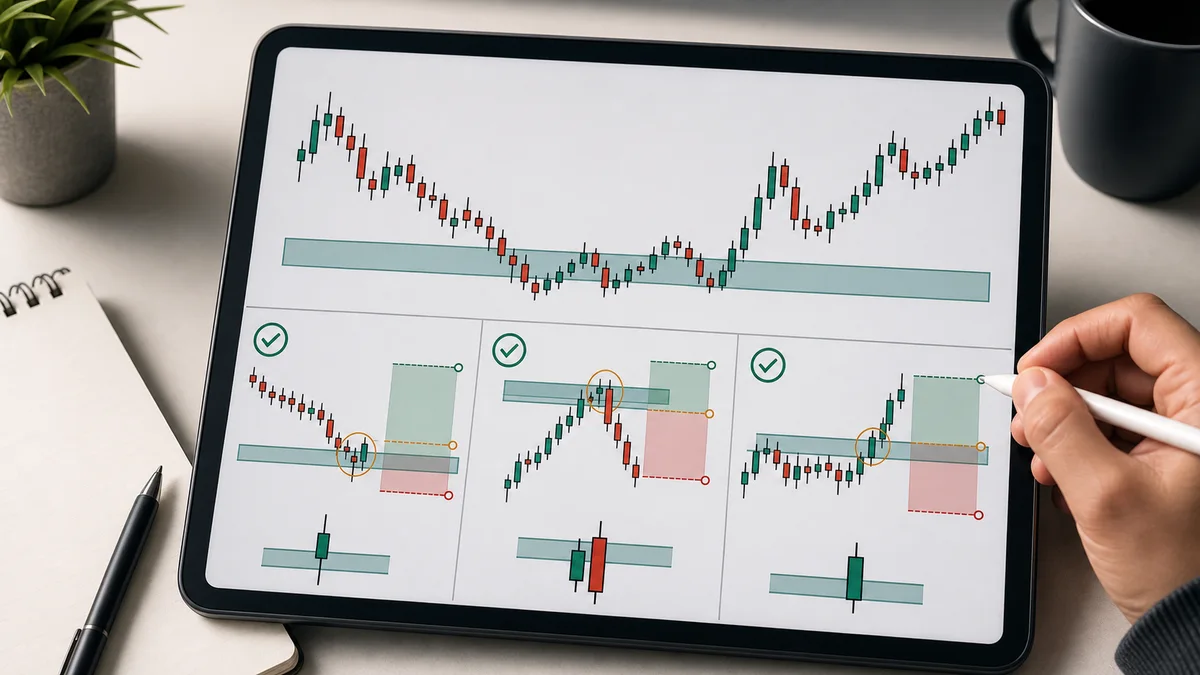
Entry, invalidation, and stop-loss logic should be designed together. A candle trigger without an invalidation rule is only a visual pattern. A stop loss without a trade thesis is only a number. MSNR candlestick confirmation becomes useful when the candle, the zone, and the risk point all support the same idea.
Rejection Candle Entries
A rejection candle entry uses the wick and close to show failed movement through a zone. At support, the trader wants to see price push below or into the support area, fail to hold lower, and close back above or near the stronger side of the zone. At resistance, the trader wants to see price push above or into resistance, fail to hold higher, and close back below or near the weaker side of the zone.
The entry can be taken after the rejection candle closes, after a small pullback, or after the next candle confirms direction. The exact rule is less important than consistency. If you enter before the rejection candle closes, you may get a better price but more false signals. If you wait for the close, you get more information but may enter farther from the zone.
Invalidation for a rejection setup often sits beyond the rejection wick, beyond the zone, or beyond the reaction swing. For a long trade from support, a break below the wick low may mean buyers failed to defend the area. For a short trade from resistance, a break above the wick high may mean sellers failed to defend the area. The stop loss should be placed with enough room for normal volatility, spread, and the instrument’s behavior.
Engulfing Candle Entries
An engulfing candle entry uses candle body control. At support, a bullish engulfing candle can suggest that buyers overwhelmed the previous bearish body. At resistance, a bearish engulfing candle can suggest that sellers overwhelmed the previous bullish body. This can be a strong visual trigger, but only if it appears at the right location.
A common mistake is buying every bullish engulfing candle or selling every bearish engulfing candle. In MSNR, the engulfing candle should appear around a clean zone, after price has tested that area, and in a context where the trade has room to move. If the engulfing candle closes directly into another resistance zone, the long setup may be poor. If a bearish engulfing candle closes directly into support, the short setup may be late.
Invalidation for an engulfing setup may sit beyond the engulfing candle, beyond the zone, or beyond the structure that created the confirmation. A trader should not automatically place the stop at the smallest possible point. The stop should be where the engulfing thesis is wrong. If that stop makes the trade too large, reduce position size or skip the setup.
Close-Based Entries
Close-based entries wait for candle acceptance. The trader may require a candle to close above a broken resistance before considering a long retest, or close below a broken support before considering a short retest. The trader may also wait for a candle to close back inside a range after a liquidity sweep, showing that the breakout attempt failed.
This style can help with discipline because it avoids acting while a candle is still moving. A candle that looks bullish with ten minutes left may close weak. A candle that wicks below support may close back above it. Waiting for the close gives the trader a confirmed reference point.
The trade-off is entry distance. A strong close can happen far from the zone. If the stop has to go beyond the zone or beyond the signal candle, the risk may become too large. A close-based entry is not automatically safer. It is safer only when the resulting trade still has a logical stop and enough room to the next target.
For all three confirmation types, position sizing comes after invalidation. First decide where the idea is wrong. Then calculate whether the stop distance fits your risk limit. Do not decide position size based on how confident the candle looks. A clear candle can still fail.
There are also times to skip confirmation. Skip if the candle forms far from the zone, if the chart is cluttered, if the signal appears during unstable news volatility, if the next support or resistance is too close, or if the candle is so large that the stop becomes unrealistic. Good execution includes the ability to pass.
A useful practice is to separate the signal candle from the execution candle in your journal. The signal candle is the candle that first shows rejection, engulfing, or acceptance. The execution candle is the candle that actually allows your entry rule. Sometimes they are the same candle. Often they are not. This distinction helps you find whether you are entering too early, waiting too long, or using the wrong stop for the confirmation type.
Also record whether the candle changed the trade location. A close-based entry may confirm the idea but move the entry farther away from the zone. If the new stop distance damages reward-to-risk, the correct decision may be to skip even though the confirmation is technically valid. The best MSNR execution is not the most aggressive entry or the latest confirmation. It is the entry that still connects the zone, candle, invalidation, and risk into one coherent plan.
Common Mistakes and Checklist
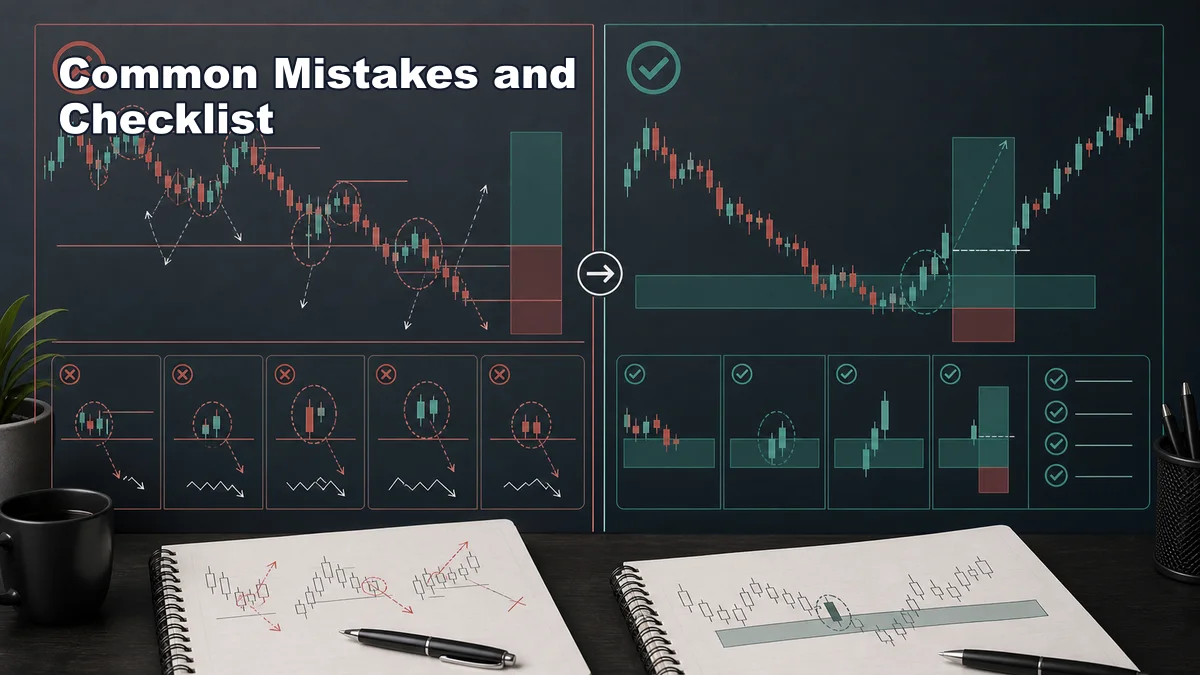
The biggest mistake is using candle names without location. A rejection candle is meaningful because it rejected a specific support or resistance zone. An engulfing candle is useful because it appears where control matters. A close-based entry is helpful because it confirms acceptance or failure around a level. Without the level, the candle is only a shape.
- Entering before the candle closes: early entries can improve price, but they can also turn a possible rejection into a failed signal.
- Ignoring higher-timeframe context: a bullish candle at support may still be weak if price is under major resistance or inside a strong downtrend.
- Using one candle as certainty: no candle guarantees a reversal, breakout, or continuation.
- Forgetting invalidation: every candle trigger needs a clear point where the idea is wrong.
- Placing stops inside normal candle noise: a stop that is too tight can fail before the trade idea is actually invalid.
- Chasing large signal candles: a strong candle can close so far from the zone that reward-to-risk becomes poor.
- Ignoring the next obstacle: confirmation is less useful when the target area is too close.
- Changing rules after the result: decide before entry whether you require wick rejection, body close, engulfing, follow-through, or retest.
Use this checklist before an MSNR candlestick confirmation entry:
- Is price at a meaningful support or resistance zone?
- Does the higher timeframe support the trade idea or warn against it?
- Is the candle showing rejection, engulfing, acceptance, or failure clearly?
- Did the candle close in a useful position?
- Do I need follow-through or a lower-timeframe shift before entry?
- Where is the trade invalid?
- Does the stop-loss location match the invalidation point?
- Can I size the position within my risk limit?
- Is the next target far enough to justify the trade?
- Will I journal the setup whether it wins or loses?
Download the MSNR Checklist: Use this article as a trade-planning checklist beside the full MSNR trading strategy guide. Focus on the sequence: zone first, candle second, invalidation third, risk always.
FAQ
What is MSNR candlestick confirmation?
MSNR candlestick confirmation is the use of candle behavior around a support or resistance zone to judge whether a trade idea has enough evidence for entry, needs more confirmation, or should be skipped.
Is a rejection candle enough to enter an MSNR trade?
Not by itself. A rejection candle should appear at a meaningful zone, fit the market context, and provide a clear invalidation point. The trade still needs stop-loss and position-size logic.
Are engulfing candles better than rejection candles?
Neither is automatically better. Engulfing candles can show stronger body control, while rejection candles can show failed movement through a zone. The better signal is the one that fits the context and risk plan.
Why do close-based entries matter?
Close-based entries help traders avoid acting while a candle is still forming. They can reduce false starts, but they may also enter later, so the trader must check stop distance and target room.
Where should the stop loss go after candlestick confirmation?
The stop loss should be placed around the point where the candle and zone thesis are wrong, such as beyond the rejection wick, beyond the engulfing structure, beyond the SNR zone, or beyond acceptance on the other side.
Connect this setup to the wider framework
Candle confirmation should be attached to a pre-existing zone. Use support-zone validation, resistance-zone validation, and fresh-versus-tested state before reading the trigger.
A rejection or engulfing candle gains context from market structure, BOS and CHoCH, and breakout-versus-fakeout validation.
Sources and limits
General market-risk and technical-analysis references:
Strategy labels and chart examples are interpretive; they are not standardized signals and do not guarantee outcomes.
Related reading: MSNR Confirmation Entry: When to Wait for the Bar Close · MSNR Rejection Candle: How to Read a Real Bounce From a Fake One